
Docker is powerful and simple to use. Docker allows developers to create portable, self-contained images for the software they create. These images can be reliably and repeatably deployed. You can get a lot of value out of Docker very easily, but to get the most out of Docker there are some concepts that are important to understand. How you build your Docker image has a measurable impact when you are doing continuous integration and continuous delivery. In this article I will focus on how to take a more efficient approach to building Docker images for Spring Boot applications when doing iterative development and deployment. The standard approach has some drawbacks so here we look at what they are and how to do it better.
Key Docker concepts
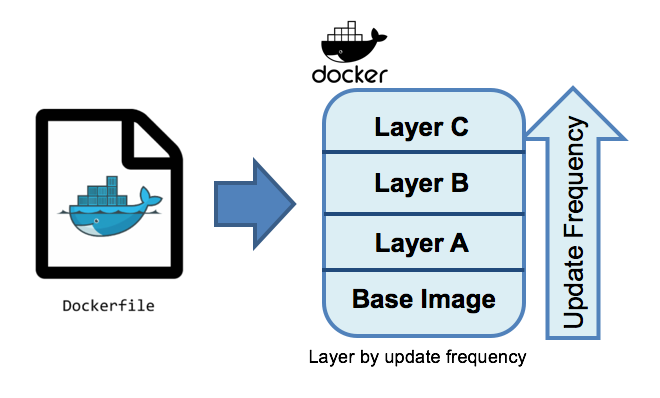
There are four key Docker concepts at play: images, layers, the Dockerfile and the Docker cache. Simply put, the Dockerfile describes how to build the Docker image. An image consists of a number of layers. The Dockerfile starts with a base image and adds on additional layers. A new layer is generated when new content is added to the image. Each layer that is built is cached so it can be re-used on subsequent builds. When a Docker build runs, it will re-use any existing layers that it can from the cache. This reduces the overall time and space needed for each build. Anything that has changed, or has not been built before, will be built as needed.
Layer content matter
This is where the importance of layers come in. Existing layers in the Docker cache can only be used if the contents of that layer are unchanged. The more layers which are changed between Docker builds, the more work Docker needs to do to rebuild the image. The layer order also matters. A layer can only be reused if all of its parent layers are unchanged. It is best to place more frequently changed layers later so that changes to them impact fewer children layers.
The order and contents of the layers matter. When you package your application as a Docker image, the easiest approach is to shove the whole application in a single layer. However, if that application includes a lot of static library dependencies, when you change even the smallest amount of code, the whole layer needs to be rebuilt. This ends up wasting a lot of build time and space in the Docker cache.
Layers impact deployment
Layers also matter when the Docker images are deployed. Before Docker images are deployed, they are pushed to a remote Docker Repository. This repository acts as the source for all deployment images and often contains a lot of versions of the same image. Docker is very efficient, only storing each layer once. However, for images which are frequently deployed and have large layers which are constantly rebuilt, this efficiency can’t work. Large layers, even with minimal changes inside them, have to be separately stored in the repository and pushed around the network. This negatively affects deployment time because of the need to move and store duplicate bits for the pieces which are not changing.
Spring Boot apps in Docker
Spring Boot applications, with the uber-jar approach, are themselves self-contained units of deployment. This model is excellent for deployments on virtual machines or with build packs, since the app brings everything it needs with it. However, this is a drawback for Docker deployments: Docker already provides the means to package dependencies. It is very common to put the entire Spring Boot JAR into the Docker image. However, this results in too many unchanging bits in the application layer of the Docker image.
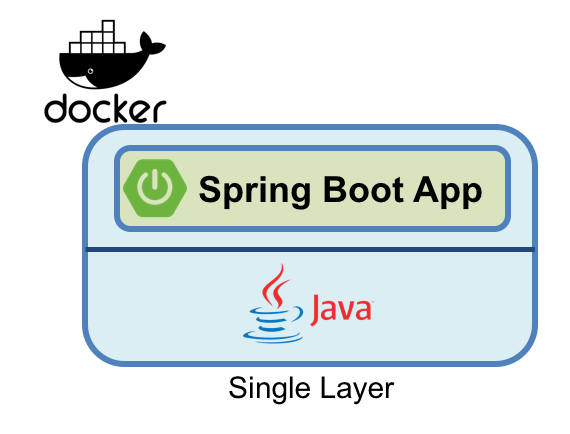
There is an on-going discussion in the Spring community about reducing deployment sizes and times when running Spring Boot apps, particularly in Docker. [1][2][3][4] In my mind, this ends up being a trade-off between simplicity versus efficiency. The most common approach to building Docker images for Spring Boot applications is what I’ll call the “single layer” approach. This isn’t technically true since there are actually more than one layers created by the Dockerfile, but its good enough for the discussion.
The single layer approach
Let’s take a look at the single layer approach. The single layer approach is quick, straight-forward, and easy to understand and use. The Spring Boot guide for Docker lays out the single layer Dockerfile to build your Docker image:
FROM openjdk:8-jdk-alpine
VOLUME /tmp
ARG JAR_FILE
COPY ${JAR_FILE} app.jar
ENTRYPOINT ["java","-Djava.security.egd=file:/dev/./urandom","-jar","/app.jar"]
The end result is a functioning Docker image that runs exactly the way you’d expect a Spring Boot app to run. However, it suffers from the layering efficiency problem because its based on the entire application JAR. As the application source is changed, the entire Spring Boot JAR is rebuilt. The next time the Docker image is built, the entire application layer is rebuilt, including all of the library dependencies which didn’t change.
Let’s take a look at a concrete example, in this case Spring Pet Clinic.
A deeper look at the single layer approach
The single layer approach builds a Docker image with the Spring Boot JAR as the Docker layer on top of a the Open JDK base image:
$ docker images
REPOSITORY                    TAG         IMAGE ID            CREATED             SIZE
springio/spring-petclinic     latest      94b0366d5ba2        16 seconds ago      140MB
The resulting Docker image is 140 MB.
You can inspect the layers using the docker history command.
You can see the Spring Boot application JAR which was copied into the image with a size of 38.3 MB.
$ docker history springio/spring-petclinic
IMAGE               CREATED             CREATED BY                                      SIZE                COMMENT
94b0366d5ba2        52 seconds ago      /bin/sh -c #(nop)  ENTRYPOINT ["java" "-Djav…   0B
213dff56a4bd        53 seconds ago      /bin/sh -c #(nop) COPY file:d3551559c2aa35af…   38.3MB
bc453a32748e        6 minutes ago       /bin/sh -c #(nop)  ARG JAR_FILE                 0B
7fe0bb0d8026        6 minutes ago       /bin/sh -c #(nop)  VOLUME [/tmp]                0B
cc2179b8f042        8 days ago          /bin/sh -c set -x  && apk add --no-cache   o…   97.4MB
<missing>           8 days ago          /bin/sh -c #(nop)  ENV JAVA_ALPINE_VERSION=8…   0B
<missing>           8 days ago          /bin/sh -c #(nop)  ENV JAVA_VERSION=8u151       0B
<missing>           8 days ago          /bin/sh -c #(nop)  ENV PATH=/usr/local/sbin:…   0B
<missing>           8 days ago          /bin/sh -c #(nop)  ENV JAVA_HOME=/usr/lib/jv…   0B
<missing>           8 days ago          /bin/sh -c {   echo '#!/bin/sh';   echo 'set…   87B
<missing>           8 days ago          /bin/sh -c #(nop)  ENV LANG=C.UTF-8             0B
<missing>           5 months ago        /bin/sh -c #(nop)  CMD ["/bin/sh"]              0B
<missing>           5 months ago        /bin/sh -c #(nop) ADD file:093f0723fa46f6cdb…   4.15MB
The next time the Docker image is built, that entire 38 MB layer will be recreated because the JAR file is repackaged.
In this example, the app size is relatively small (being only based on the spring-boot-starter-web and other dependencies like spring-actuator). In the real world, these sizes are often quite a bit larger as they include not just the Spring Boot libraries but other third-party libraries too. From my experience, real-world Spring Boot applications can range in size from 50 MB – 250 MB, if not larger.
Looking more closely at the application, only 372 KB of the application JAR is the application code. The remaining 38 MB are the library dependencies. This means that only 0.1% of the layer is actually changing. The remaining 99.9% is unchanged.
The layer life-cycle
This demonstrates the basic consideration of layering: the life-cycle of the contents. The contents of a layer should have the same life-cycle. There are two different life-cycles for the contents of the Spring Boot app: the infrequently changing library dependencies, and the frequently changing application classes.
Each time the layer is rebuilt due to an application code change the non-changing binaries are also included. In rapid application development environments, where the application code is constantly changed and re-deployed, this additive cost can become very expensive.
Imagine an application team iterating on Pet Clinic. The team changes and redeploys the application 10 times per day. The cost of those 10 new layers will be 383 MB, per day. Using more real world sizes, this can be up to 2.5 GB or more per day. This ends up being a significant waste of build time, deployment time and Docker Repository space.
This rapid, incremental development and delivery is when the trade-off becomes important. Continue with the simple single layer approach, or adopt a more efficient alternative.
Embrace Docker, go dual layer
In this trade-off is between simplicity and efficiency, I feel the right choice is a "dual layer" approach. (More layers are possible, but too many layers can be detrimental and are against Docker best practices). In the dual layer approach, we structure the Docker image such that the library dependencies of the Spring Boot app exist in a layer below the application code. This way, the layers adhere to the different life-cycles of the content. By pushing the infrequently changing library dependencies down into a separate layer, and keeping only the application classes in the top layer, iterative rebuilds and re-deployments will be much faster.
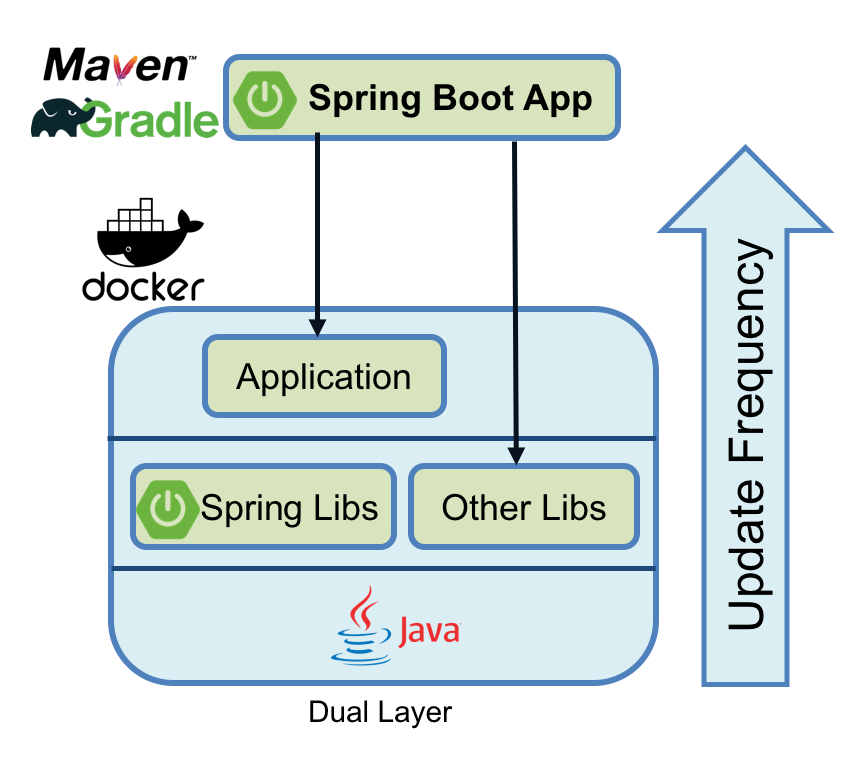
The dual layer approach speeds-up iterative development builds and minimizing deployment time. Results will vary by application but on average this reduces application deployment sizes by 90% with a corresponding reduction in deployment cycle times.
In the next post of this series, Creating Dual Layer Docker images for Spring Boot apps, I’ll cover how we build a dual layer Docker image for Spring Boot applications with a new tool in the Open Liberty project.


