Reactive messaging between microservices with MicroProfile on Open Liberty 19.0.0.9

MicroProfile Reactive Messaging provides an easy way to send and receive messages within and between microservices using Kafka message brokers. Open Liberty 19.0.0.9 provides a full implementation of MicroProfile Reactive Messaging 1.0.
Open Liberty 19.0.0.9 also introduces easier testing of your data source connections in Liberty apps with REST APIs, as well as some updates to OpenID Connect when a Liberty server is configured as an OpenID Connect Provider.
Give it a try in Open Liberty 19.0.0.9.
In Open Liberty 19.0.0.9:
-
Reactive messaging in microservices (MicroProfile Reactive Messaging 1.0)
-
Testing database connections in Liberty apps with REST APIs (REST Connector 2.0)
-
Managing tokens on a Liberty Open ID Connect provider (OpenID Connect Server 1.0)
-
Support OAuth 2.0 client secret and access token hashing (OpenID Connect Server 1.0)
-
Support for PKCE in Liberty OpenID Connect providers (OpenID Connect Server 1.0)
View the list of fixed bugs from 19.0.0.9
Run your apps using 19.0.0.9
If you’re using Maven, here are the coordinates:
<dependency>
    <groupId>io.openliberty</groupId>
    <artifactId>openliberty-runtime</artifactId>
    <version>19.0.0.9</version>
    <type>zip</type>
</dependency>
Or for Gradle:
dependencies {
    libertyRuntime group: 'io.openliberty', name: 'openliberty-runtime', version: '[19.0.0.9,)'
}
Or if you’re using Docker:
docker pull open-libertyOr take a look at our Downloads page.

Reactive messaging in microservices (MicroProfile Reactive Messaging)
MicroProfile Reactive Messaging provides a very easy-to-use way to send, receive, and process messages and is well-suited to writing applications that process streams of events. With MicroProfile Reactive Messaging, you annotate application beans' methods and, under the covers, Liberty converts these to reactive streams-compatible publishers, subscribers and processors and connects them up to each other. It also provides a Connector API to allow your methods to be connected to external messaging systems.
To enable the feature include it in your server.xml feature list:
<featureManager>
  <feature>mpReactiveMessaging-1.0</feature>
  ...
</featureManager>
With this feature in the Open Liberty runtime, an application CDI bean can have one of its methods annotated as being message driven. In the example below, the method processes messages from the "greetings" channel:
@Incoming("greetings")
publicCompletionStage <Void> consume(Message<String> greeting ){
   return greeting.ack();
}
A channel represents a stream of messages of a given type and, usually, the same topic. Channels can operate locally within the process or use message brokers to send messages between services.
For example, we could configure the consume method above to subscribe to messages from the Kafka greetings topic using a Kafka connector like so:
mp.messaging.incoming.greetings.connector=liberty-kafka
mp.messaging.incoming.greetings.group.id=greeting-consumer
mp.messaging.incoming.greetings.bootstrap.servers=kafkabrokerhost:9092
mp.messaging.incoming.greetings.key.deserializer=org.apache.kafka.common.serialization.StringDeserializer
mp.messaging.incoming.greetings.value.deserializer=org.apache.kafka.common.serialization.StringDeserializer
Here, connector is a special property in reactive messaging which defines which connector to use. bootstrap.servers, group.id, key.deserializer, and value.deserializer are properties understood by the Kafka client API. This set of properties is the minimum that must be defined to receive messages from a Kafka topic.
The liberty-kafka connector operates according to the reactive messaging specification. For example the configuration above sets the consume method to consume messages from a Kafka topic queue. Further Kafka client properties can be set for the channel by setting properties that are picked up by the MicroProfile Config specification. For example, System properties via Open Liberty’s bootstrap.properties file or environment variables from Open Liberty’s server.env file. As per the reactive messaging specification the following configuration properties are passed to the Kafka client:
mp.messaging.incoming.greetings.[PROPERTY-NAME]=value1
mp.messaging.connector.liberty-kafka.[PROPERTY-NAME]=value2
These are passed to the Kafka Consumer factory method as:
PROPERTY-NAME=valueSo, for example, a full set of properties to access IBM Public Cloud Event Streams could look like:
mp.messaging.incoming.greetings.connector=liberty-kafka
mp.messaging.incoming.greetings.group.id=greeting-consumer
mp.messaging.incoming.greetings.key.deserializer=org.apache.kafka.common.serialization.StringDeserializer
mp.messaging.incoming.greetings.value.deserializer=org.apache.kafka.common.serialization.StringDeserializer

mp.messaging.connector.liberty-kafka.bootstrap.servers=broker-1-eventstreams.cloud.ibm.com:9093,broker-2-eventstreams.cloud.ibm.com:9093
mp.messaging.connector.liberty-kafka.sasl.jaas.config=org.apache.kafka.common.security.plain.PlainLoginModule required username="token" password="my-apikey";
mp.messaging.connector.liberty-kafka.sasl.mechanism=PLAIN
mp.messaging.connector.liberty-kafka.security.protocol=SASL_SSL
mp.messaging.connector.liberty-kafka.ssl.protocol=TLSv1.2
When using Kafka-based channels, Open Liberty Reactive Messaging 1.0 loads the Kafka client classes using the application classloader. If you are using the liberty-kafka connector to read or write Kafka messages, include in your application a Kafka client API jar that is compatible with your Kafka server. For example, the /WEB-INF/lib/ folder would be a suitable place to place a Kafka client JAR when building the application’s .war file.
Find out more:
Testing database connections in Liberty apps with REST APIs
How many times have you had to write a server-side test that gets a connection just to check if your configuration is valid and your app can connect to your database? Now by using the REST API provided by the restConnector-2.0 feature, you can validate supported elements of your configuration via REST endpoints.
To enable these REST endpoints, enable the restConnector-2.0 feature for any server using JDBC, JCA, JMS, or Cloudant technologies; for example:
<server>
  <featureManager>
    <feature>appSecurity-2.0</feature>
    <feature>restConnector-2.0</feature>
    <feature>jdbc-4.2</feature>
  </featureManager>
  <keyStore id="defaultKeyStore" password="Liberty"/>
  <quickStartSecurity userName="blogAdmin" userPassword="blogAdminPassword"/>
  <library id="derby">
    <file name="${server.config.dir}/derby/derby.jar"/>
  </library>
  <dataSource id="DefaultDataSource">
    <jdbcDriver libraryRef="derby"/>
    <!-- Example properties referencing an in-memory Derby Embedded database -->
    <properties.derby.embedded databaseName="memory:defaultdb" createDatabase="create" user="dbuser" password="dbpass"/>
  </dataSource>
...
</server>
To find out more:
Managing tokens on a Liberty Open ID Connect provider (OpenID Connect Server 1.0)
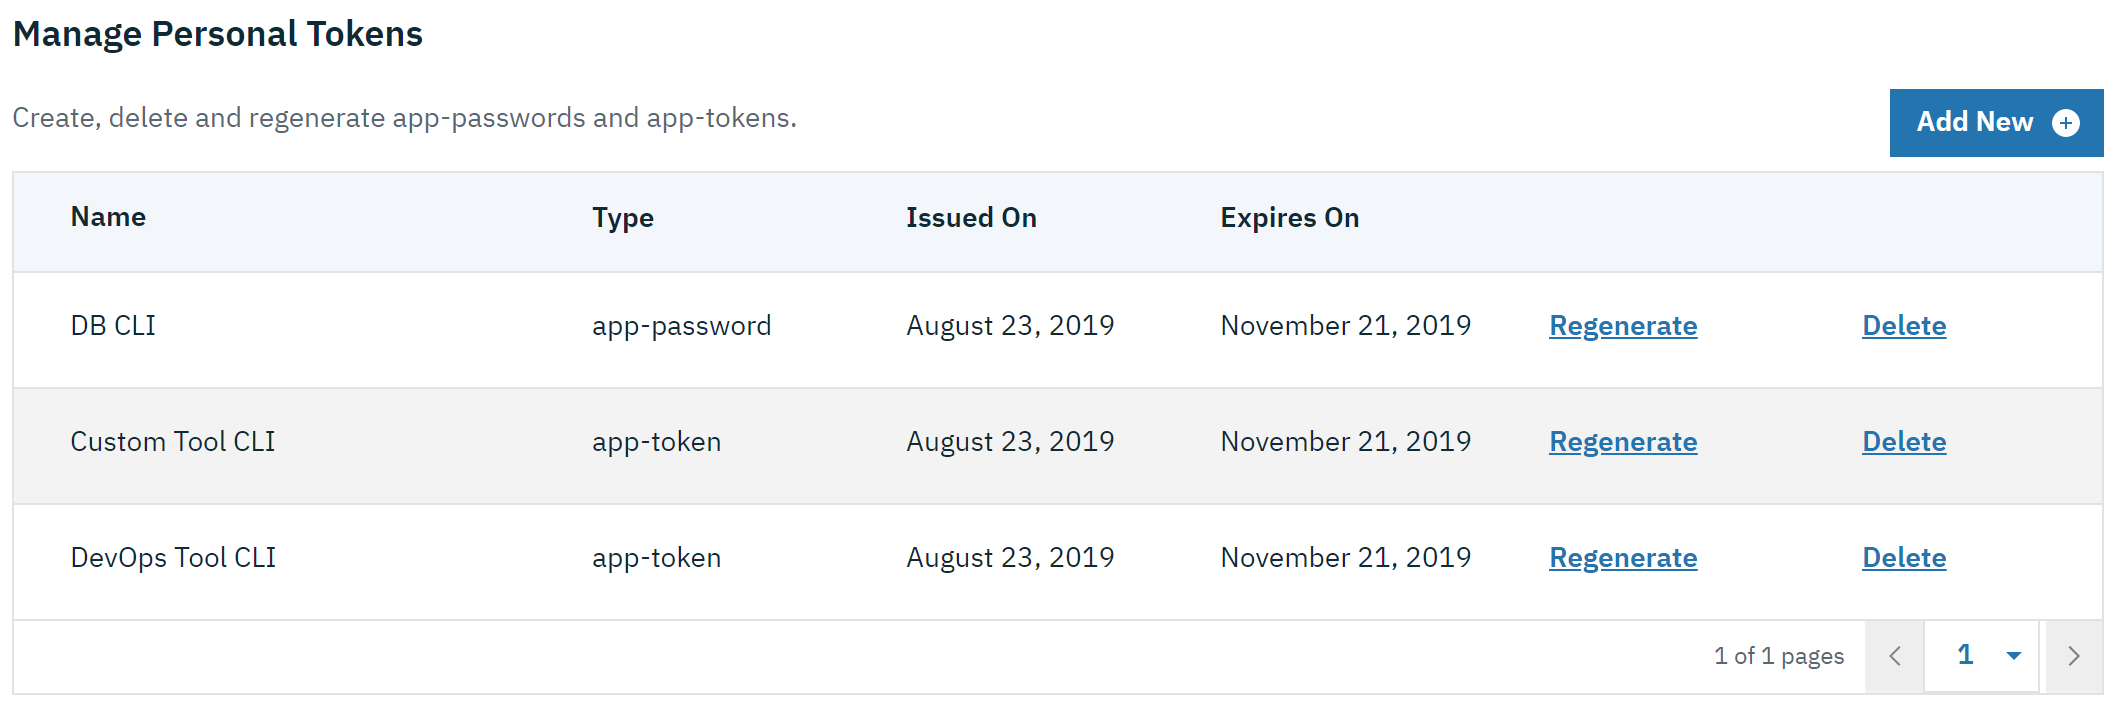
The Liberty OpenID Connect Server feature can now generate application passwords and application tokens for non-interactive (e.g. non-browser) clients to authenticate into OAuth protected resource services. The application password is an alternative password that you can use like a normal password in OAuth resource owner password grant type. The application token is a long-lived OAuth access token that is used like a normal OAuth access token.
The applications can then use them to access secured resources on servers that are configured to accept OAuth access tokens from the OpenID Connect server. The user’s password is never exposed to the app, and the tokens can be revoked independently if needed. App-passwords are exchanged repetitively by the non-browser app for short-lived access tokens using a standard OAuth ROPC flow. So if an access token is ever compromised, it is not valid for long. App-tokens are long-lived access tokens.
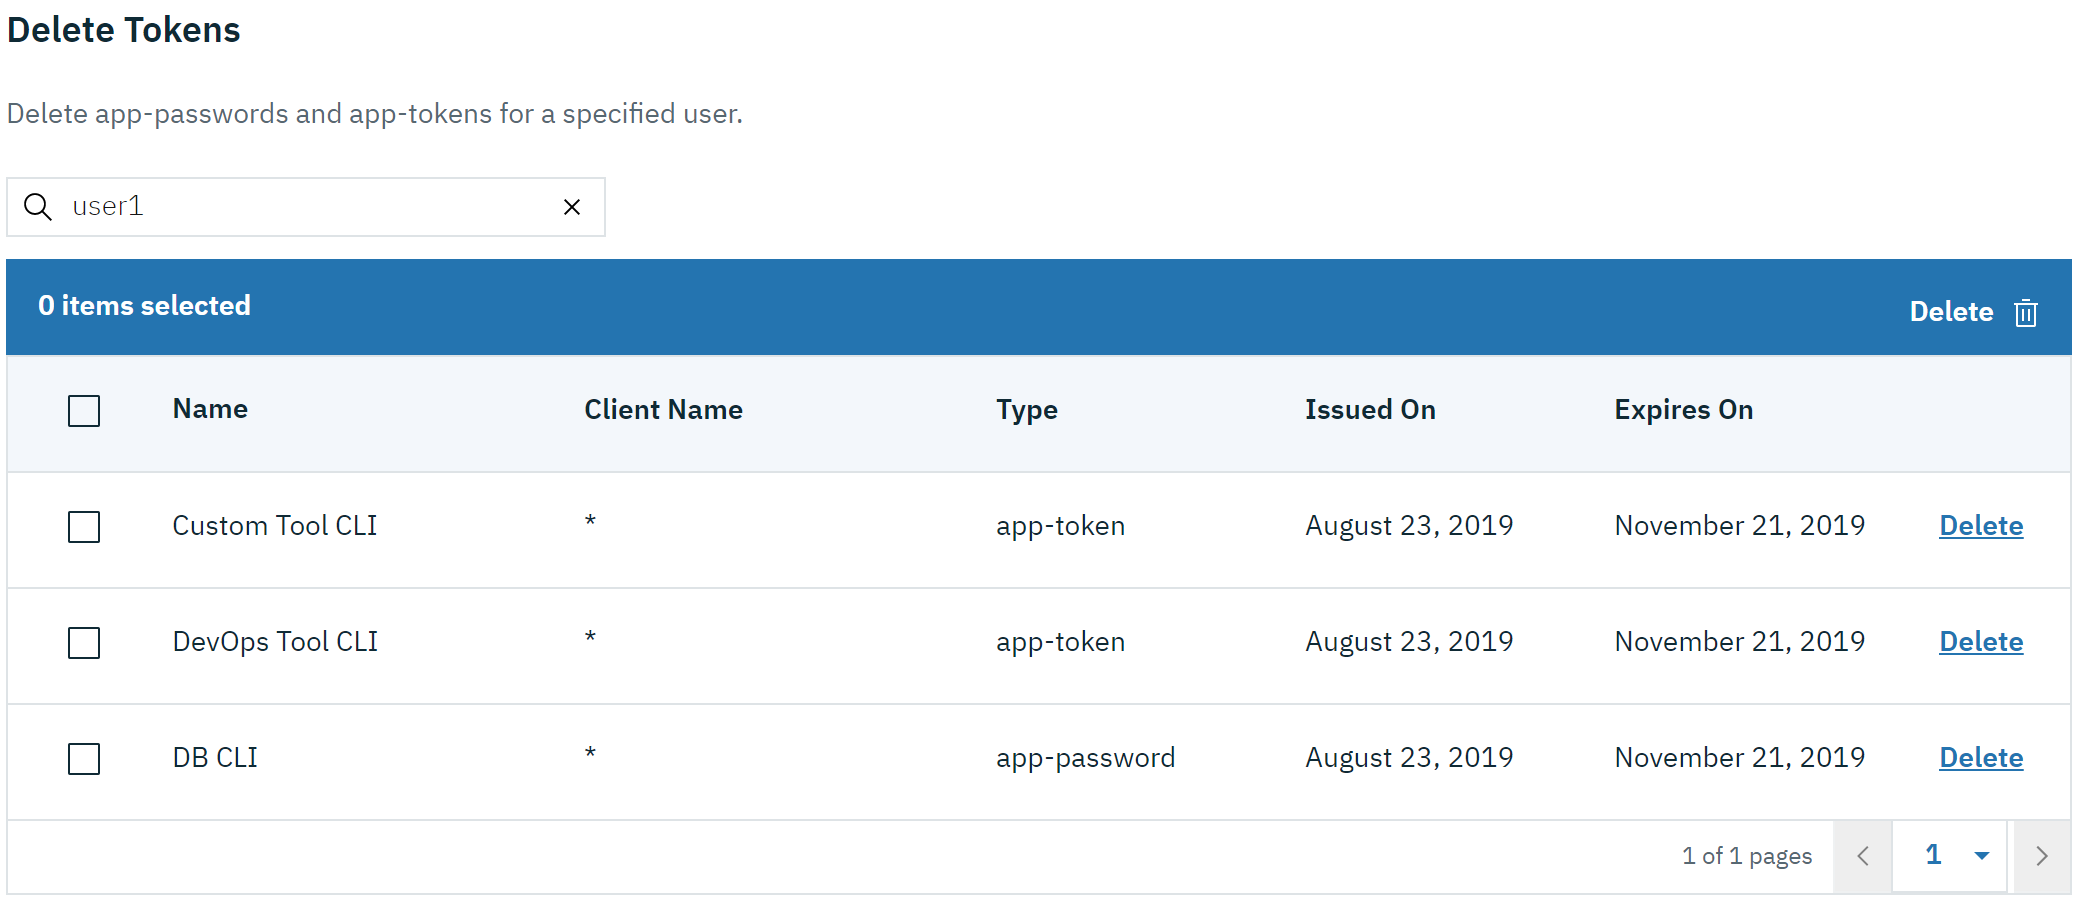
The tokens can be administered using REST interfaces and the Admin Center.
To give it a go, create a new Liberty server and use this server.xml. Comments in server.xml explain the new configuration attributes. This server doesn’t have a backing database because it is for demo purposes only.
<server>
    <featureManager>
      <feature>openidConnectServer-1.0</feature>
    </featureManager>

    <openidConnectProvider id="OP" oauthProviderRef="OAuth"
        signatureAlgorithm="RS256" keyStoreRef="defaultKeyStore"
        jwkEnabled="true"
    >
    </openidConnectProvider>

    <!-- internalClientID and internalClientSecret match a defined
         client and are used in creating app-passwords and app-tokens.
         passwordGrantRequiresAppPassword enables the ROPC flow to
         exchange app-passwords for short-lived access tokens.
         appPasswordLifetime and appTokenLifetime set the lifetime of these tokens.
    -->
    <oauthProvider id="OAuth" tokenFormat="mpjwt"
      passwordGrantRequiresAppPassword="true"
      internalClientId="RP"
      internalClientSecret="thesecret"
      appPasswordLifetime="30d"
      >
        <!--
         localStore for demo use, a backing database is used instead in production.
         When localStore is used, all client data and token status is held
         in memory only.
        -->
        <localStore>

          <!-- appPasswordAllowed and appTokenAllowed allow
          this client to create app-passwords and app-tokens -->
          <client displayname="RP" enabled="true"
                name="RP" secret="thesecret"
                scope="openid profile email"
                preAuthorizedScope="openid profile email"
                appPasswordAllowed="true"
                appTokenAllowed="true"
          >
                <redirect>https://localhost:19443/oidcclient/redirect/RP</redirect>
          </client>
        </localStore>
    </oauthProvider>

    <oauth-roles>
        <authenticated>
            <special-subject type="ALL_AUTHENTICATED_USERS" />
        </authenticated>
         <tokenManager>
           <!-- this user can manage the app-passwords and tokens of other users -->
            <user name="admin" />
        </tokenManager>
    </oauth-roles>

    <!-- Basic registry for test / development use. -->
    <basicRegistry id="basic" realm="customRealm">
        <user
          name="admin"
          password="adminpwd" />
        <user
          name="demouser2"
          password="demopassword2" />
         <group name="users">
             <member name="admin"/>
             <member name="demouser2" />
        </group>
    </basicRegistry>

    <httpEndpoint id="defaultHttpEndpoint" host="*" httpPort="29080" httpsPort="29443" />
    <keyStore id="defaultKeyStore" password="keyspass" />

</server>
Now users can request and manage their own tokens at
https://host:port/oidc/endpoint/(provider id)/personalTokenManagement:
Token admins can administer the tokens of other users at https://host:port/oidc/endpoint/(provider id)/usersTokenManagement:
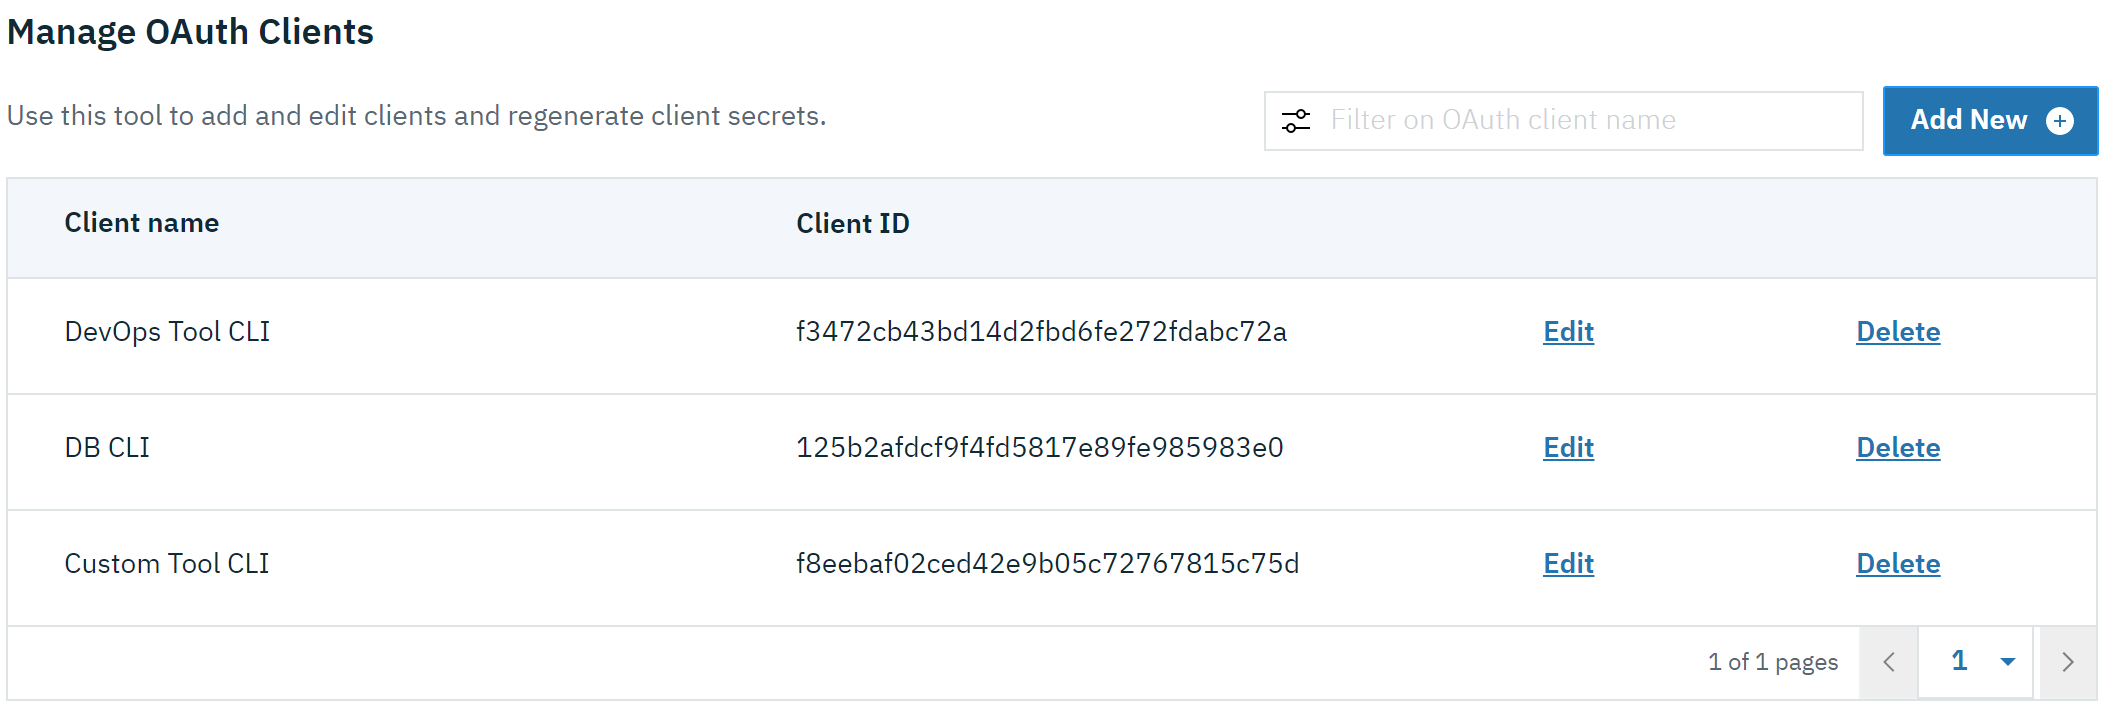
Servers using a database (not this example) can now manage client registration at https://host:port/oidc/endpoint/(provider id)/clientManagement:
To try it out, start the server and log in as admin, adminpwd at
https://localhost:29443/oidc/endpoint/OP/personalTokenManagement
Support OAuth 2.0 client secret and access token hashing (OpenID Connect Server 1.0)
In Openid Connect Server, you can now store OAuth client secret and access token in cryptographic hash forms like password hash to mitigate data breach if database is compromised. Liberty’s OpenID Connect Provider used to require database/volume encryption to protect the OAuth access token and client secrets. With this update, Liberty’s OpenID Connect provider can be configured to secure both access token and client secret in the same way as the user password, and store them as password hashes based on PBKDF2WithHmacSHA512 algorithm in addition to security.
To configure the server, edit the server.xml
<server>
        <featureManager>
                <feature>openidConnectServer-1.0</feature>
                <feature>ssl-1.0</feature>
                <feature>jdbc-4.0</feature>
                <feature>jndi-1.0</feature>
        </featureManager>

        <openidConnectProvider id="OP" oauthProviderRef="OAuthConfigDerby"
               signatureAlgorithm="RS256" keyStoreRef="defaultKeyStore"
               jwkEnabled="true"  >
        </openidConnectProvider>

        <basicRegistry
                id="basic"
                realm="BasicRealm"
        >
                <user
                        name="testuser"
                        password="testuserpwd" />
        </basicRegistry>

        <keyStore
                id="defaultKeyStore"
                password="keyspass" />

        <oauth-roles>
                <authenticated>
                        <user name="testuser" />

                </authenticated>
                <clientManager>
                        <user name="testuser" />
                        <group name="group1" />
                </clientManager>
        </oauth-roles>

        <jdbcDriver id="DerbyEmbedded">
                <library>
                        <fileset
                                dir="${server.config.dir}/derby"
                                includes="derby.jar" />
                </library>
        </jdbcDriver>

        <dataSource
                id="OAuthFvtDataSource"
                jndiName="jdbc/OAuth2DB"
                jdbcDriverRef="DerbyEmbedded"
        >

        <oauthProvider
                id="OAuthConfigDerby"
                filter="request-url%=ssodemo"
                oauthOnly="false" clientSecretEncoding="PBKDF2WithHmacSHA512" accessTokenEncoding="PBKDF2WithHmacSHA512"
        >
                <databaseStore
                        dataSourceRef="OAuthFvtDataSource"
                        user="bob"
                        password="bob"
                        schema="testSchema1" />
                <autoAuthorizeClient>dclient01</autoAuthorizeClient>
                <autoAuthorizeClient>dclient02</autoAuthorizeClient>
        </oauthProvider>

        <webAppSecurity
                httpOnlyCookies="false"
                allowFailOverToBasicAuth="true" />

        <httpSession cookieHttpOnly="false" />

        <javaPermission
                className="java.net.SocketPermission"
                name="" [ToDO: there is an asterisk sign in the quotation marks]
                actions="connect,resolve"
    />
        <javaPermission
                codebase="${server.config.dir}/derby/derby.jar"
                className="java.security.AllPermission"
                name="*"
                actions="*" />
</server>
Support for PKCE in Liberty OpenID Connect providers (OpenID Connect Server 1.0)
Liberty Openid Connect Server now automatically enables the support of Proof Key for Code Exchange (PKCE) specification (OAuth 2.0 RFC 7636) to prevent interception of the OAuth authorization code. The Proof Key for Code Exchange (PKCE, pronounced pixie) is a technique for public clients to mitigate the threat of code interception. The technique allows the client first creating a secret called code_verifier when requesting an authorization code, and then using that secret again when exchanging the authorization code for an access token. Additionally, the secret is sent to the authorization server as a hash called the code_challenge when requesting an authorization code. An attacker who intercepts the authorization code is now unable to redeem it for an access token, as they are not in possession of the code_verifier secret.
<server>
    <featureManager>
      <feature>openidConnectServer-1.0</feature>
    </featureManager>

    <openidConnectProvider id="OP" oauthProviderRef="OAuth"
        signatureAlgorithm="RS256" keyStoreRef="defaultKeyStore"
        jwkEnabled="true"
    >
    </openidConnectProvider>

    <!--
    -->
    <oauthProvider id="OAuth" ....
      >
        <!--
         localStore for demo use, a backing database is used in production.
         When localStore is used, all client data and token status is held
         in memory only.
        -->
        <localStore>

          <!-- This client is public client and enabled the Proof Key For Code Exchange. The provider expects the client to send code_challenge in the authorization code request and corresponding code_verifier in the token request -->
          <client displayname="RP" enabled="true"
                name="RP" secret="thesecretisoptional"
                scope="openid profile email"
                preAuthorizedScope="openid profile email"
                publicClient="true"
                proofKeyForCodeExchange="true"
          >
                <redirect>https://localhost:19443/oidcclient/redirect/RP</redirect>
          </client>
        </localStore>
    </oauthProvider>

    <oauth-roles>
        <authenticated>
            <special-subject type="ALL_AUTHENTICATED_USERS" />
        </authenticated>
    </oauth-roles>

    <!-- Basic registry for test / development use. -->
    <basicRegistry id="basic" realm="customRealm">
        ..
    </basicRegistry>

    <httpEndpoint id="defaultHttpEndpoint" host="*" httpPort="29080" httpsPort="29443" />
    <keyStore id="defaultKeyStore" password="keyspass" />
</server>
Get Liberty 19.0.0.9 now
Available through Maven, Gradle, Docker, and as a downloadable archive.


