
Enabling observability in microservices with traces, metrics, and logs using OpenTelemetry and Grafana
New
Prerequisites:
Table of contents
Learn how to enable the collection of traces, metrics, and logs from microservices by using MicroProfile Telemetry and the Grafana stack.
What you’ll learn
In a microservices architecture, it can be difficult to understand how services interact, where latency occurs, and what causes failures. Without visibility across service boundaries, diagnosing issues and tuning performance can become slow and error-prone.
Observability helps address these challenges by capturing telemetry data such as logs, metrics, and traces. OpenTelemetry is an open source framework that provides APIs, SDKs, and tools for generating and managing this data. MicroProfile Telemetry uses OpenTelemetry to enable both automatic and manual instrumentation in MicroProfile applications. Traces and metrics, along with runtime and application logs, can be exported in a standardized format through an OpenTelemetry Collector to any compatible backend.
In this guide, you’ll use the Grafana Docker OpenTelemetry LGTM image (grafana/otel-lgtm), an open source Docker image that provides a preconfigured observability backend for OpenTelemetry, based on the Grafana stack. This setup includes:
-
OpenTelemetry Collector: a gateway for receiving telemetry data from applications
-
Prometheus: a time-series database for storing numerical metrics, like request rates and memory usage
-
Loki: a log aggregation system for collecting and querying logs
-
Tempo: a distributed tracing backend that stores traces, which represent the path and timing of a request as it flows across services
-
Grafana: a dashboard tool that brings together logs, metrics, and traces for visualization and analysis
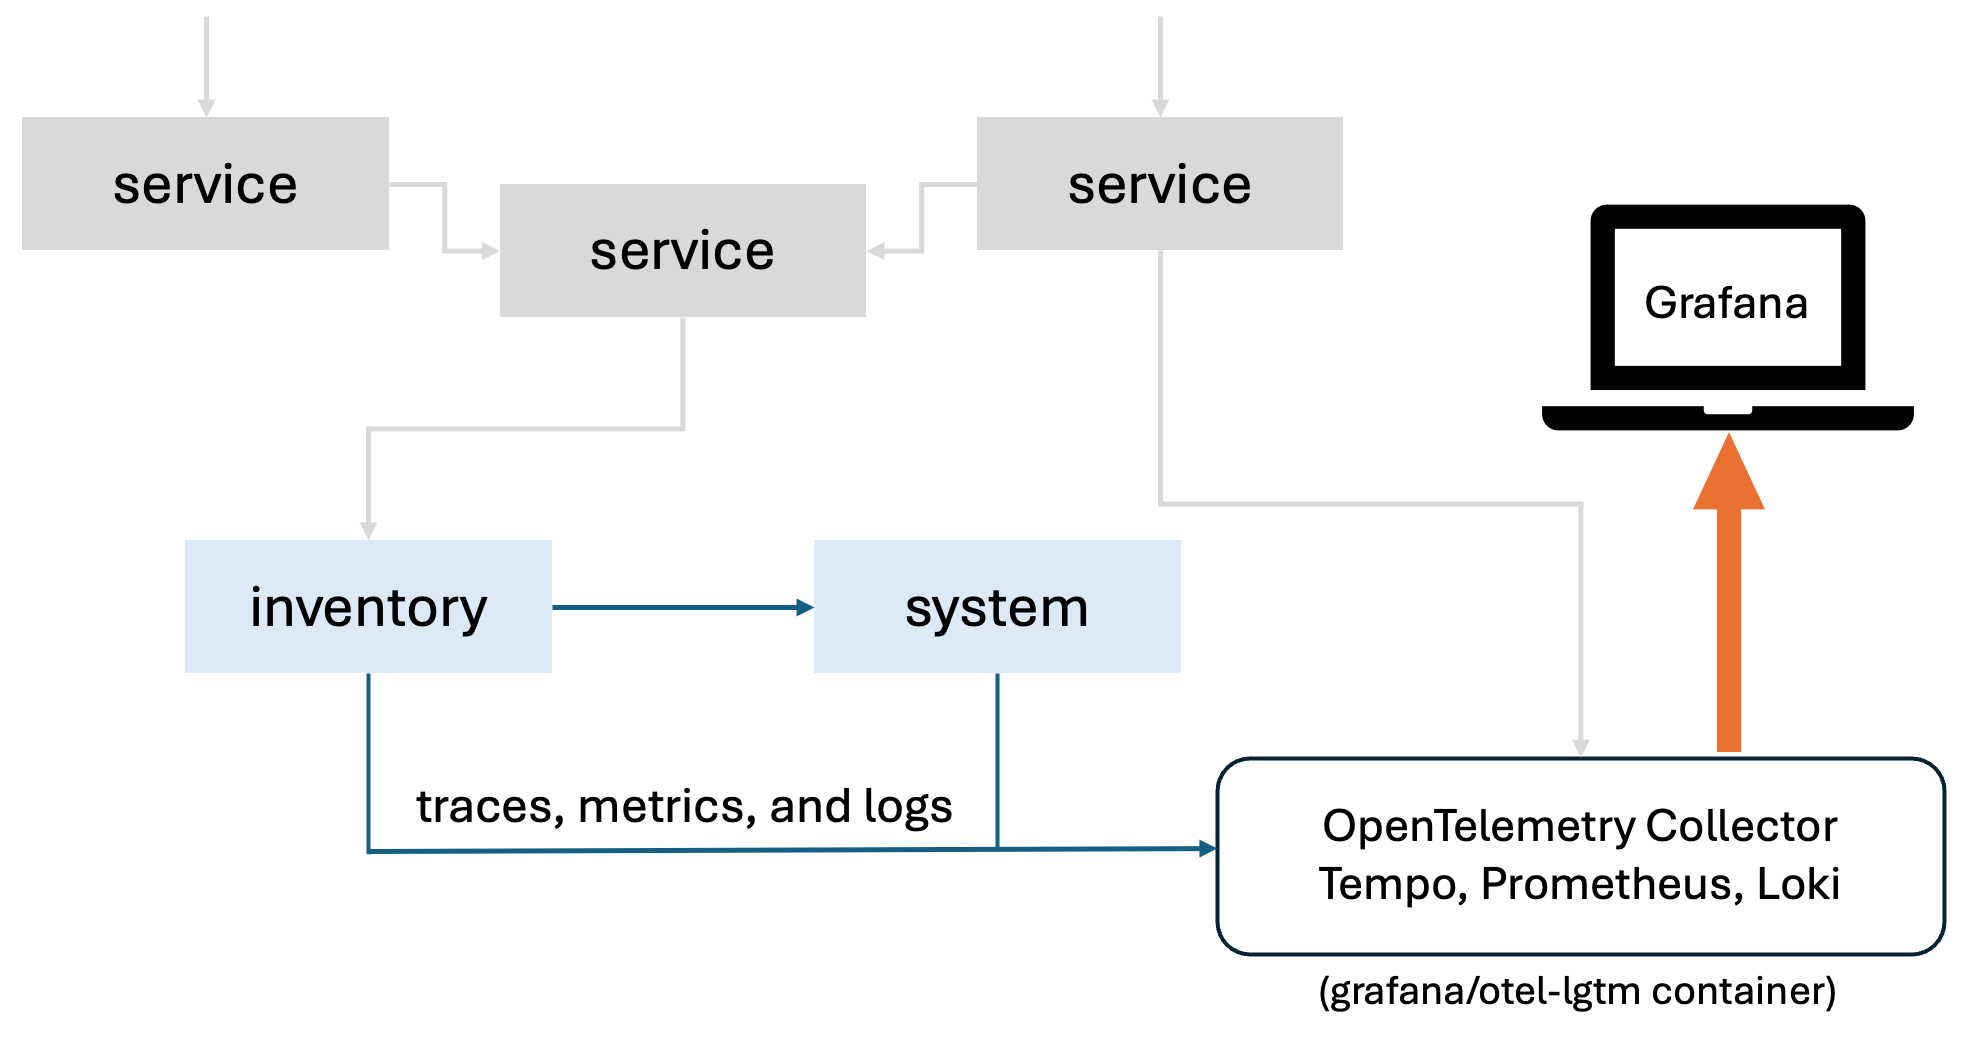
The diagram shows a distributed environment with multiple services. For simplicity, this guide configures only the system and inventory services.
The system service provides system load information, while the inventory service retrieves and stores this data by calling the system service through a MicroProfile REST Client. Both services expose endpoints built with Jakarta RESTful Web Services.
In addition, the inventory service makes periodic background requests to the system service every 15 seconds to refresh system load information for all stored systems.
You’ll learn how to enable automatic collection of traces, metrics, and logs from microservices by using MicroProfile Telemetry, and visualize them in Grafana.
Additional prerequisites
Before you begin, ensure that Docker is installed and running on your system. For installation instructions, see the official Docker documentation.
Start a container from the grafana/otel-lgtm Docker image by running the following command:
docker run -d --name otel-lgtm -p 3000:3000 -p 4317:4317 -p 4318:4318 --rm -ti grafana/otel-lgtm
You can monitor the container startup by viewing its logs:
docker logs otel-lgtm
It may take a minute for the container to start. After you see the following message, your observability stack is ready:
The OpenTelemetry collector and the Grafana LGTM stack are up and running.
When the container is running, you can access the Grafana dashboard at the http://localhost:3000 URL.
Getting started
The fastest way to work through this guide is to clone the Git repository and use the projects that are provided inside:
git clone https://github.com/openliberty/guide-microprofile-telemetry-grafana-automatic.git
cd guide-microprofile-telemetry-grafana-automatic
The start directory contains the starting project that you will build upon.
The finish directory contains the finished project that you will build.
Before you begin, make sure you have all the necessary prerequisites.
Try what you’ll build
The finish directory in the root of this guide contains the finished application. Give it a try before you proceed.
To try out the application, go to the finish directory and run the following Maven goal to build the system service and deploy it to Open Liberty:
WINDOWS
MAC
LINUX
mvnw.cmd -pl system liberty:run./mvnw -pl system liberty:run./mvnw -pl system liberty:runNext, open another command-line session in the finish directory and run the following command to start the inventory service:
WINDOWS
MAC
LINUX
mvnw.cmd -pl inventory liberty:run./mvnw -pl inventory liberty:run./mvnw -pl inventory liberty:runAfter you see the following message in both command-line sessions, both of your services are ready:
The defaultServer server is ready to run a smarter planet.
When both services are running, visit the http://localhost:9081/inventory/systems/localhost URL. This action triggers the inventory service to retrieve and store system load information for localhost by making a request to the system service at http://localhost:9080/system/systemLoad.
In addition, the inventory service makes periodic background requests to the system service every 15 seconds to refresh system load information for all stored systems.
You can view the telemetry data collected from the running services in the Grafana dashboard at the http://localhost:3000 URL.
Viewing trace with Tempo
-
Open the Explore view from the left menu.
-
Select Tempo as the data source.
-
Set Query type to
Search. -
Click the blue Run query button at the upper right of the Explore view to list recent traces.
-
Find and click the trace ID for the request named
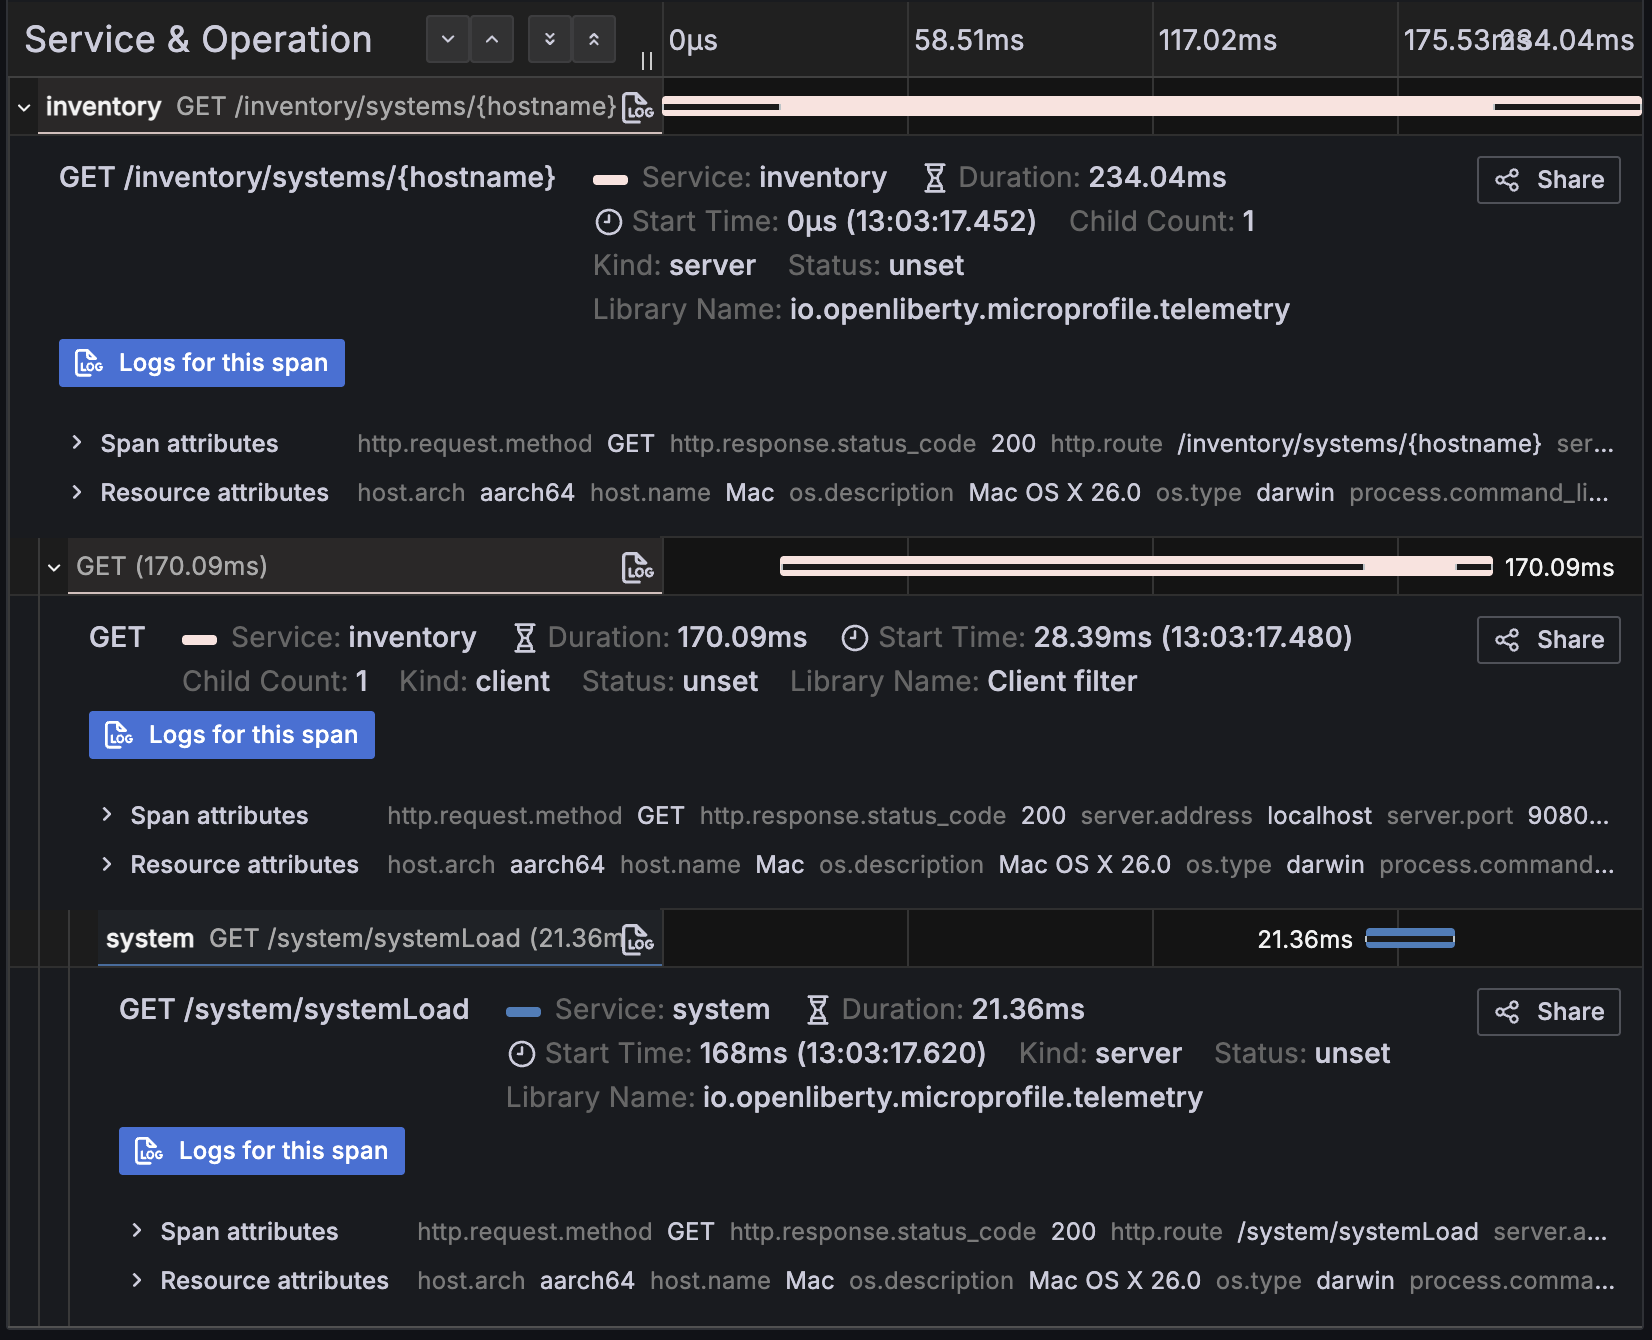
GET /inventory/systems/{hostname}. You see the following result in the Trace view: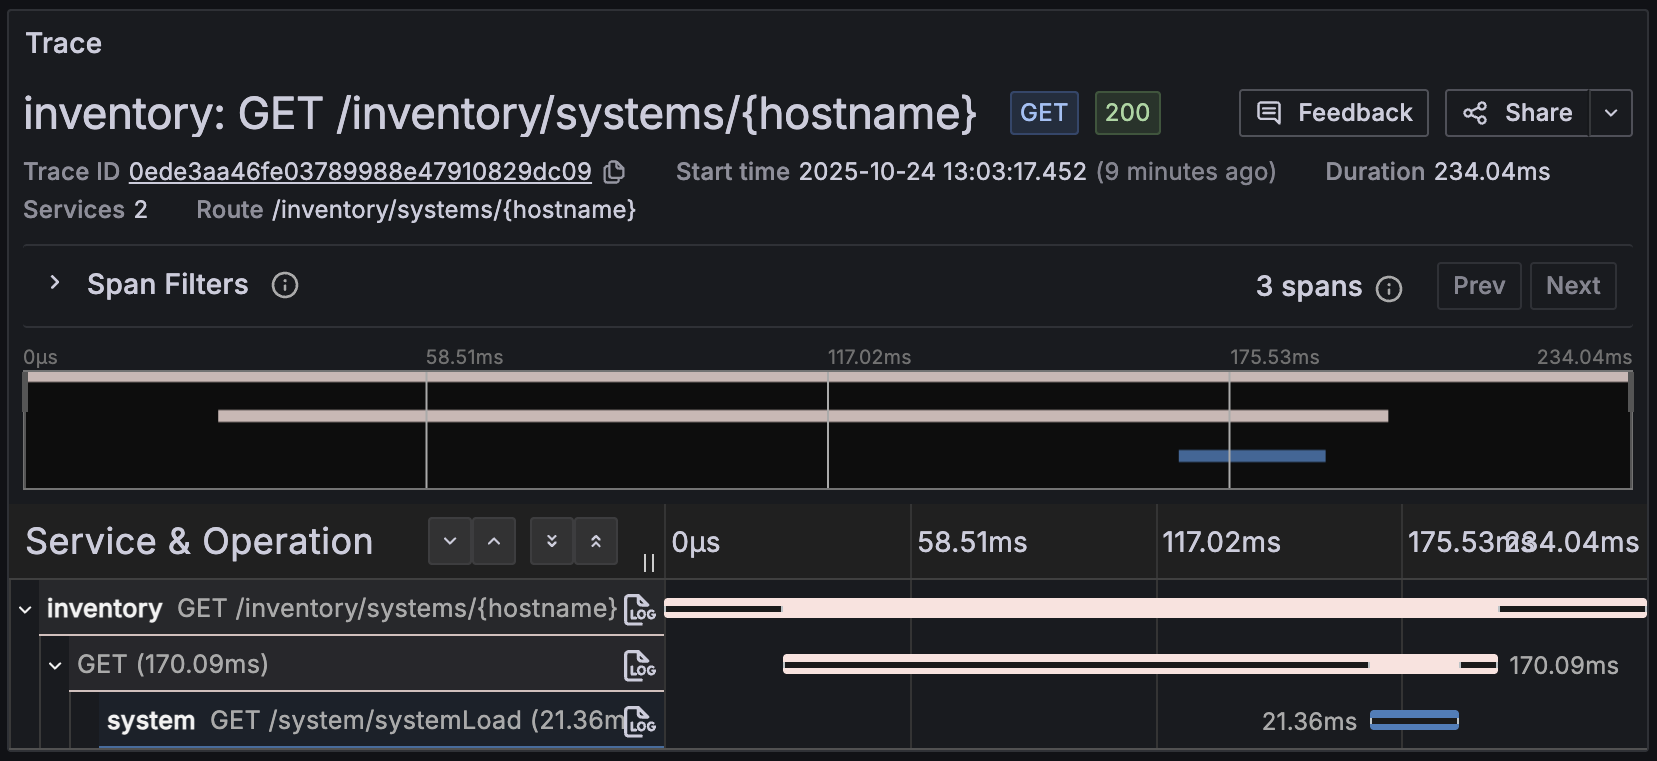
The trace contains three spans, two from the
inventoryservice and one from thesystemservice.
Viewing logs with Loki
-
Open the Drilldown → Logs view from the left menu. This view displays an overview of time-series log counts and log entries for all services that send logs to Loki.
-
Click Show logs for a service to display its log entries inline and expand a log entry to view the full trace context.
Viewing metrics with Prometheus
-
Open the Drilldown → Metrics view from the left menu. This view shows a query-less experience for browsing the available metrics that are collected by Prometheus.
-
For a more detailed view of any metric, click the Select button next to its graph.
After you’re finished reviewing the application, stop the Open Liberty instances by pressing CTRL+C in the command-line sessions where you ran the system and inventory services. Alternatively, you can run the following goals from the finish directory in another command-line session:
WINDOWS
MAC
LINUX
mvnw.cmd -pl system liberty:stop
mvnw.cmd -pl inventory liberty:stop
./mvnw -pl system liberty:stop
./mvnw -pl inventory liberty:stop./mvnw -pl system liberty:stop
./mvnw -pl inventory liberty:stopEnabling automatic telemetry collection
MicroProfile Telemetry automatically collects telemetry data without requiring changes to your application code. To collect and export telemetry data, you need to enable the MicroProfile Telemetry feature and configure the required OpenTelemetry properties in your application.
Navigate to the start directory to begin.
Start by adding the MicroProfile Telemetry feature to the server.xml file of each service.
Replace theserver.xmlfile of the inventory service.inventory/src/main/liberty/config/server.xml
inventory/server.xml
 1<server description="inventory service">
 2
 3    <featureManager>
 4        <platform>jakartaee-10.0</platform>
 5        <platform>microprofile-7.1</platform>
 6        <feature>cdi</feature>
 7        <feature>jsonb</feature>
 8        <feature>jsonp</feature>
 9        <feature>restfulWS</feature>
10        <feature>mpConfig</feature>
11        <feature>mpRestClient</feature>
12        <feature>enterpriseBeansLite</feature>
13        <!-- tag::mpTelemetry[] -->
14        <feature>mpTelemetry</feature>
15        <!-- end::mpTelemetry[] -->
16    </featureManager>
17
18    <httpEndpoint httpPort="${http.port}"
19                  httpsPort="${https.port}"
20                  id="defaultHttpEndpoint" host="*" />
21
22    <webApplication location="guide-microprofile-telemetry-grafana-automatic-inventory.war"
23                    contextRoot="/" />
24
25    <logging consoleLogLevel="INFO" />
26
27</server>
The mpTelemetry feature enables MicroProfile Telemetry support in Open Liberty for the inventory service.
Replace theserver.xmlfile of the system service.system/src/main/liberty/config/server.xml
system/server.xml
 1<server description="system service">
 2
 3    <featureManager>
 4        <platform>jakartaee-10.0</platform>
 5        <!-- tag::microprofile[] -->
 6        <platform>microprofile-7.1</platform>
 7        <!-- end::microprofile[] -->
 8        <feature>jsonp</feature>
 9        <feature>restfulWS</feature>
10        <!-- tag::mpTelemetry[] -->
11        <feature>mpTelemetry</feature>
12        <!-- end::mpTelemetry[] -->
13    </featureManager>
14
15    <httpEndpoint httpPort="${http.port}"
16                  httpsPort="${https.port}"
17                  id="defaultHttpEndpoint" host="*" />
18
19    <webApplication location="guide-microprofile-telemetry-grafana-automatic-system.war"
20                    contextRoot="/" />
21
22    <logging consoleLogLevel="INFO" />
23
24</server>
Similarly, the added mpTelemetry feature enables telemetry support for the system service.
By default, the OpenTelemetry SDK is disabled to reduce performance overhead. To enable it, set the otel.sdk.disabled property to false in a valid configuration source.
Create thebootstrap.propertiesfile for the inventory service.inventory/src/main/liberty/config/bootstrap.properties
inventory/bootstrap.properties
1# tag::service[]
2otel.service.name=inventory
3# end::service[]
4# tag::disabled[]
5otel.sdk.disabled=false
6# end::disabled[]
Setting the otel.sdk.disabled property to false in the bootstrap properties file enables telemetry collection at the runtime level. This allows both runtime and application telemetry to be collected. If you instead configure this property at the application level, runtime telemetry will not be included. For more information, refer to the MicroProfile Telemetry configuration documentation.
The otel.service.name property sets the service name to inventory, helping identify the source of the telemetry data in monitoring tools like Grafana.
The observability backend provided by the grafana/otel-lgtm image receives telemetry data through the OTLP protocol, which is the default for OpenTelemetry. Therefore, no extra exporter configuration is needed.
Create thebootstrap.propertiesfile for the system service.system/src/main/liberty/config/bootstrap.properties
system/bootstrap.properties
1# tag::otel[]
2otel.service.name=system
3otel.sdk.disabled=false
4# end::otel[]
The otel.* properties are configured in the bootstrap.properties file for the system service to enable telemetry collection and define service-specific settings.
For more information about these and other Telemetry properties, see the MicroProfile Config properties for MicroProfile Telemetry documentation.
Viewing the default telemetry data
When you enable OpenTelemetry for Open Liberty, it automatically generates trace spans for Jakarta RESTful Web Services (JAX-RS) servers and clients, as well as for MicroProfile REST Clients. It also collects metrics such as HTTP request durations, JVM performance, and application activity, and captures logs from the server and the application.
For a complete list of the default metrics that Open Liberty collects when MicroProfile Telemetry is enabled, see the MicroProfile Telemetry metrics reference list.
Start the services to begin collecting telemetry data.
When you run Open Liberty in dev mode, dev mode listens for file changes and automatically recompiles and deploys your updates whenever you save a new change. Run the following command to start the system service in dev mode:
WINDOWS
MAC
LINUX
mvnw.cmd -pl system liberty:dev./mvnw -pl system liberty:dev./mvnw -pl system liberty:devOpen another command-line session and run the following command to start the inventory service in dev mode:
WINDOWS
MAC
LINUX
mvnw.cmd -pl inventory liberty:dev./mvnw -pl inventory liberty:dev./mvnw -pl inventory liberty:devWhen you see the following message, your Liberty instances are ready in dev mode:
**************************************************************
*    Liberty is running in dev mode.
Dev mode holds your command-line session to listen for file changes. Open another command-line session to continue, or open the project in your editor.
When the servers start, telemetry such as Liberty startup logs and JVM metrics is generated. To see request-scoped telemetry, interact with the services.
Visit the http://localhost:9081/inventory/systems/localhost URL to fetch and store the localhost system information in inventory, which triggers the inventory service to call the system service at http://localhost:9080/system/systemLoad.
Because the inventory service makes periodic background requests every 15 seconds to refresh system load information for all stored systems, telemetry data is continuously generated for you to monitor.
You can view the telemetry data collected from the running services in the Grafana dashboard at the http://localhost:3000 URL.
Viewing request traces
View the trace that was automatically created from your request:
-
Open the Explore view from the left menu.
-
Select Tempo as the data source.
-
Set Query type to
Search. -
Click the blue Run query button at the upper right of the Explore view to list recent traces.
-
Find and click the trace ID for the request named
GET /inventory/systems/{hostname}. You see that the trace contains three spans in the Trace view:
-
In the Service & Operation table, click each span to view detailed metadata. The
Kindproperty identifies the span type. The first span is from theinventoryservice server, handled by its Jakarta RESTful Web Services endpoint. The second span is from the MicroProfile REST Client in theinventoryservice, with theKindproperty set toclient, calling thesystemservice. The third span is from thesystemservice server, handled by its Jakarta RESTful Web Services endpoint.Each span includes details such as when the request was received, when the response was sent, the HTTP method, status code, and endpoint path, allowing you to trace the full request flow across services.
-
Expand the Node graph section to see the relationship between the spans and how the
inventoryandsystemmicroservices interact. This view helps identify latency hotspots and bottlenecks.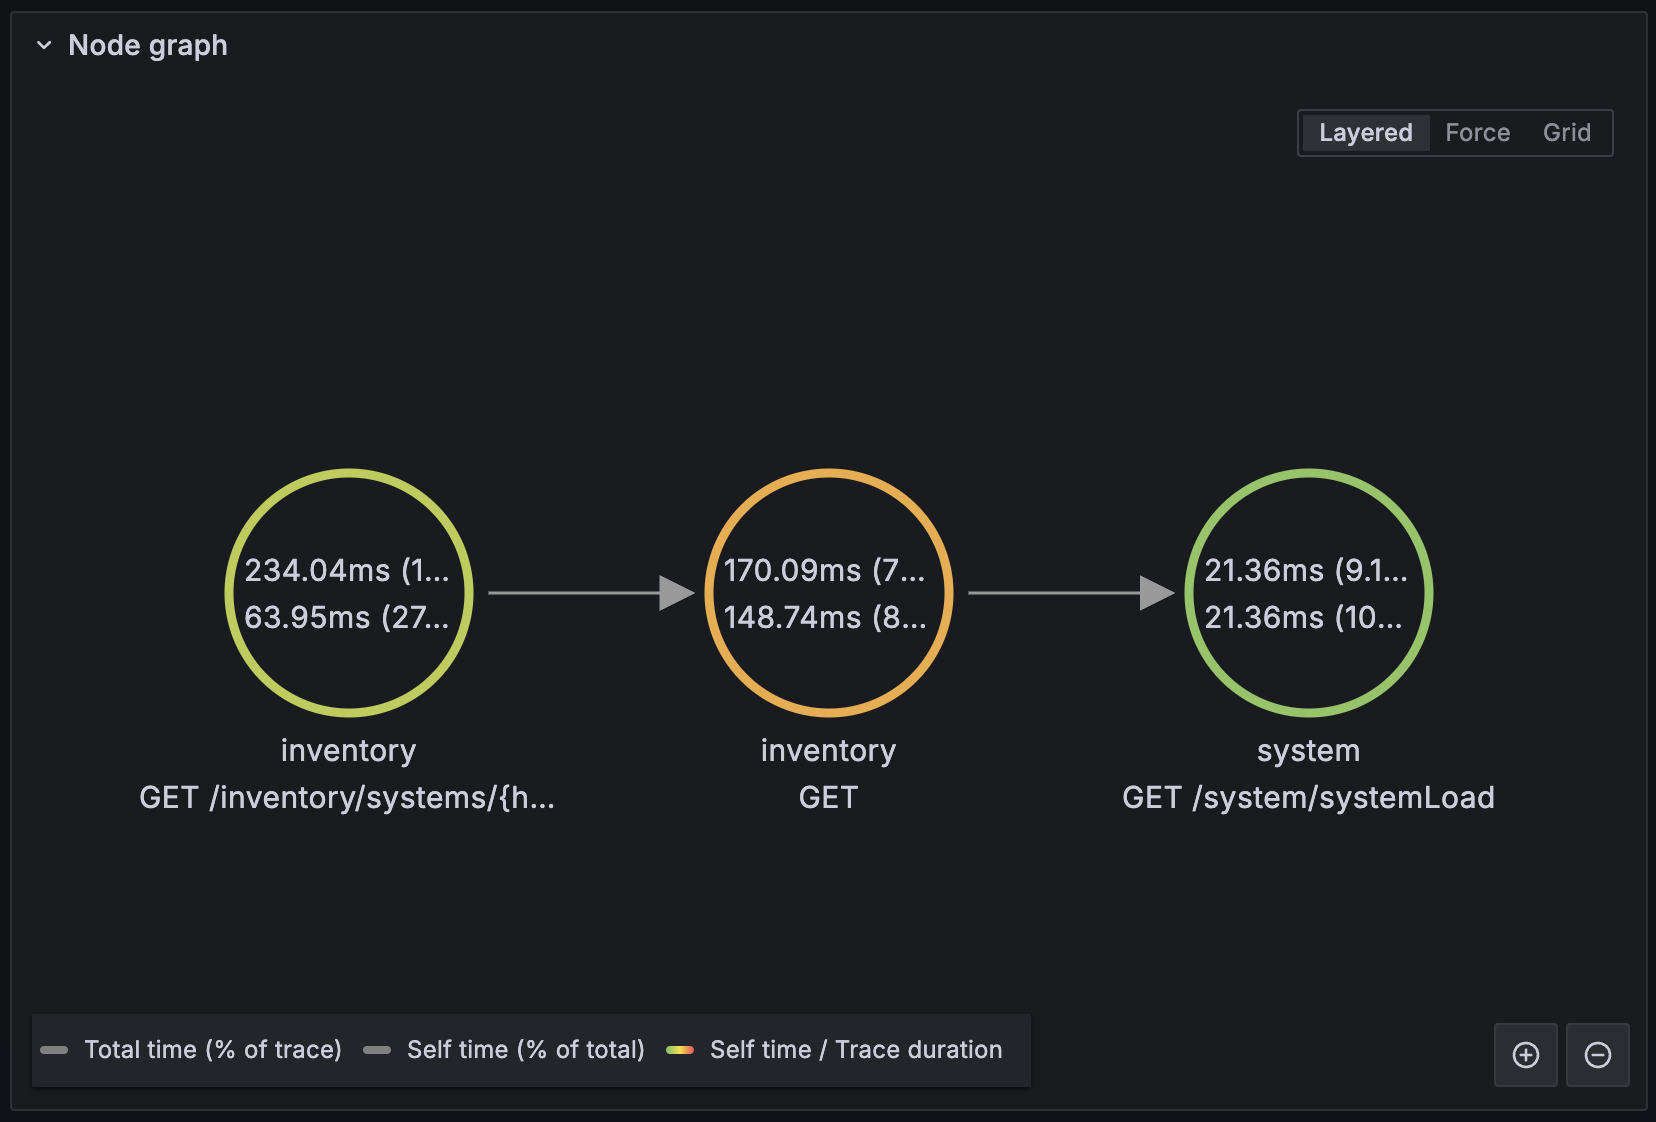
This guide demonstrates automatic tracing using MicroProfile REST Client on the client side. If you want to see how distributed tracing works with Jakarta REST Clients instead, see the Enabling distributed tracing in microservices with OpenTelemetry and Jaeger guide.
Viewing trace logs
View logs associated with a specific span:
-
From the Trace view you opened in the previous step, click the
 Log icon on the right side of the span entry in the Service & Operation table.
 -
Alternatively, click the blue Logs for this span button in the span detail section.
Viewing server logs
Monitor timestamped logs generated by the services:
-
Navigate to Drilldown → Logs from the menu. This view displays a time-series overview of log counts and log entries for all services.

-
Click Show logs for a service to display its log entries inline.
Viewing JVM metrics
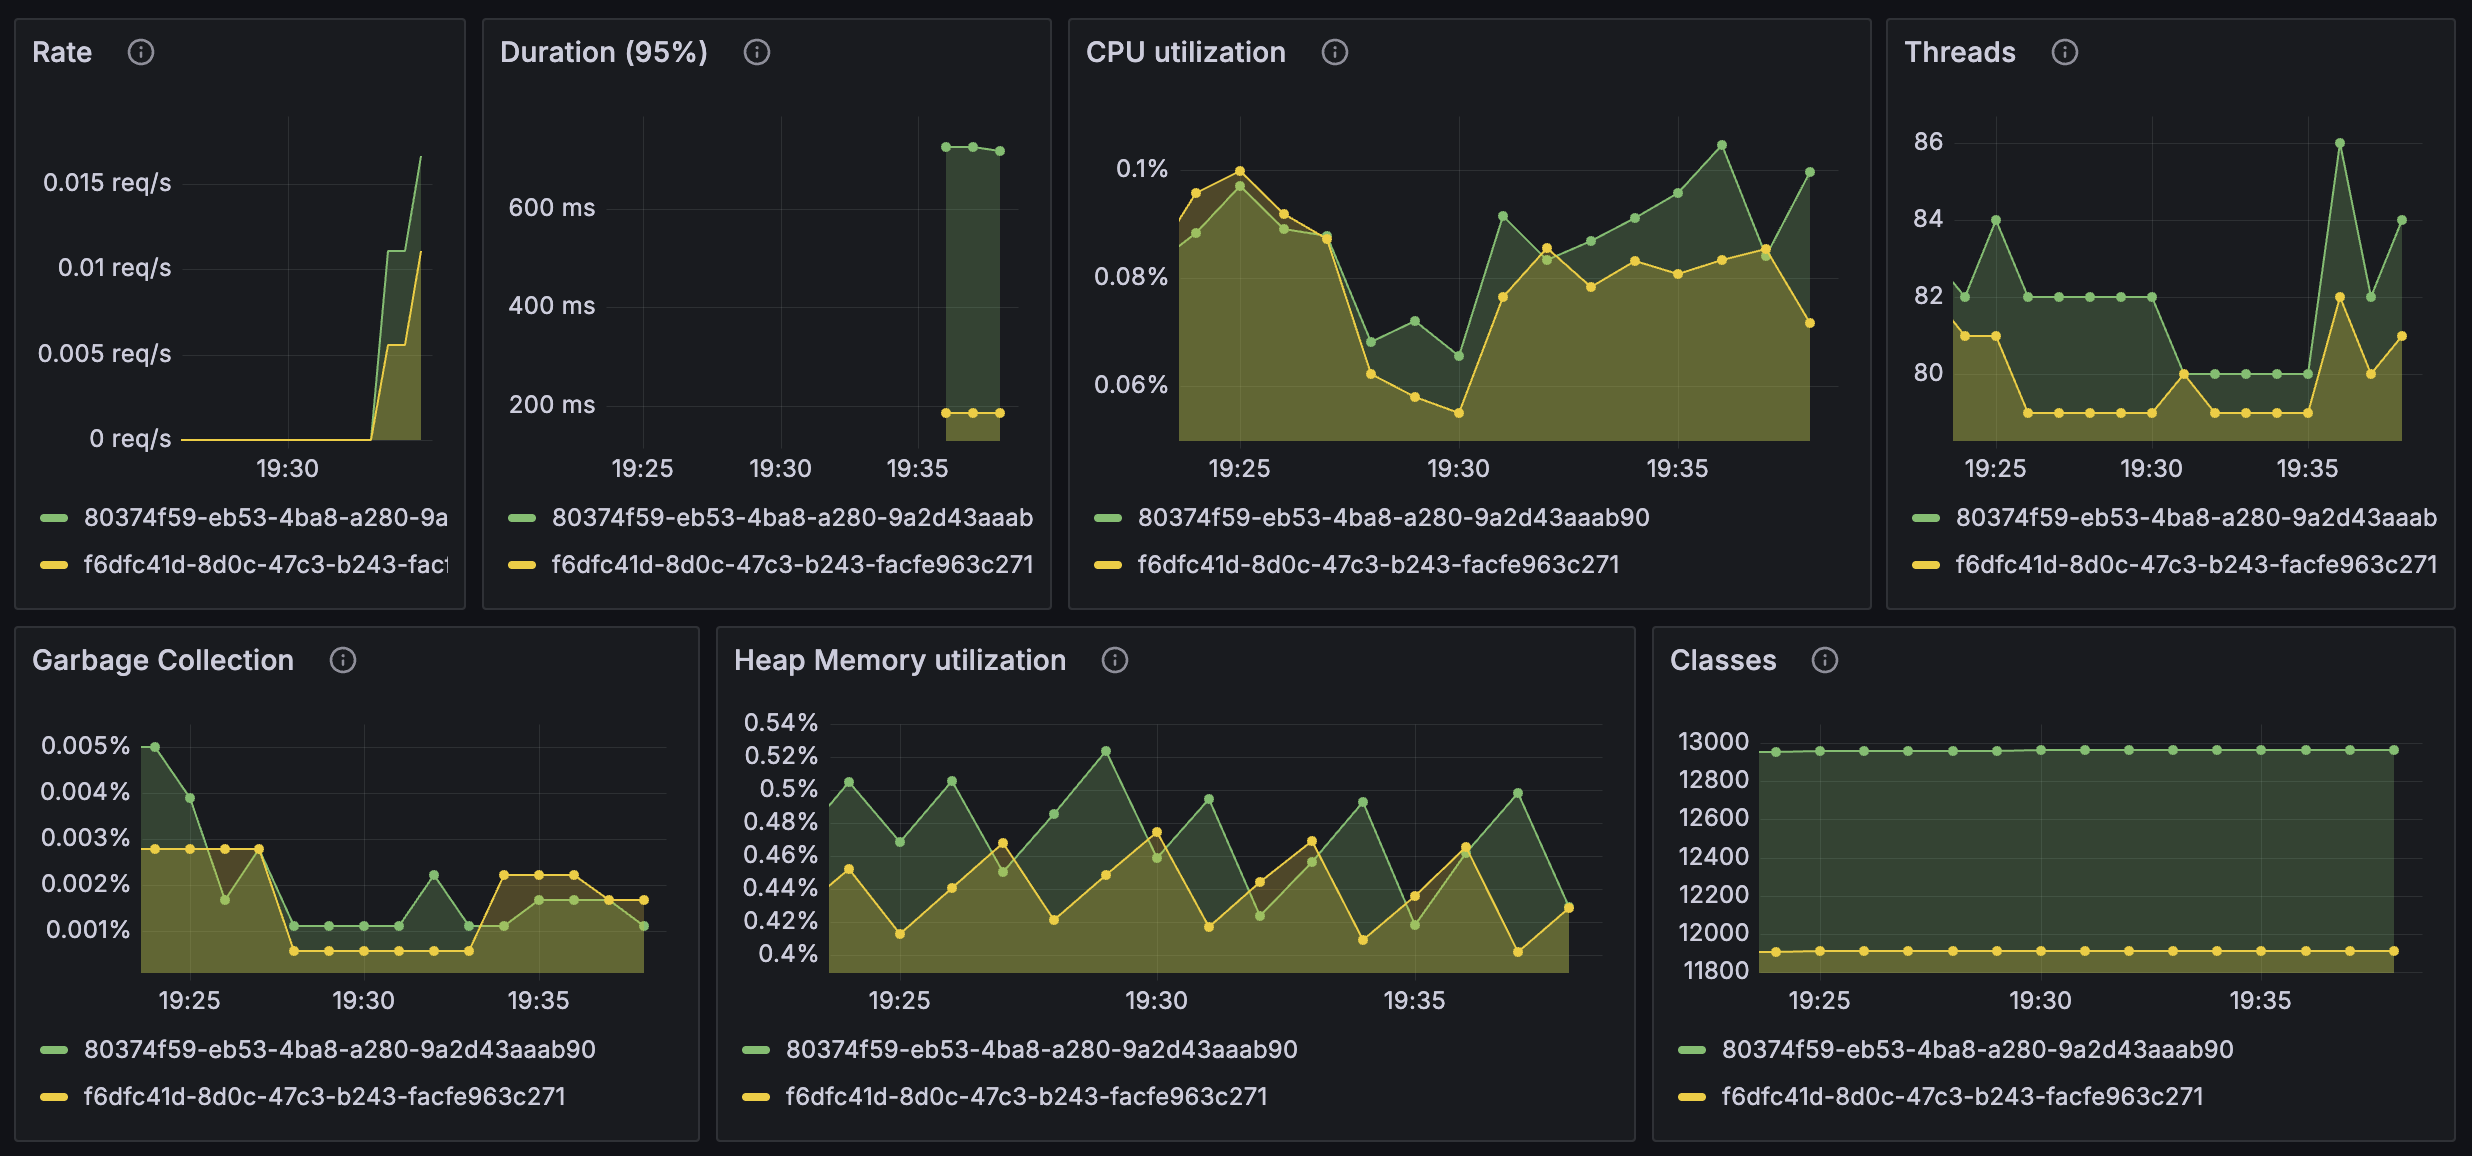
Get insights into class count, CPU usage, and heap memory utilization:
-
Open the Dashboards view from the menu.
-
Select the JVM Overview (OpenTelemetry) dashboard.
Viewing HTTP metrics
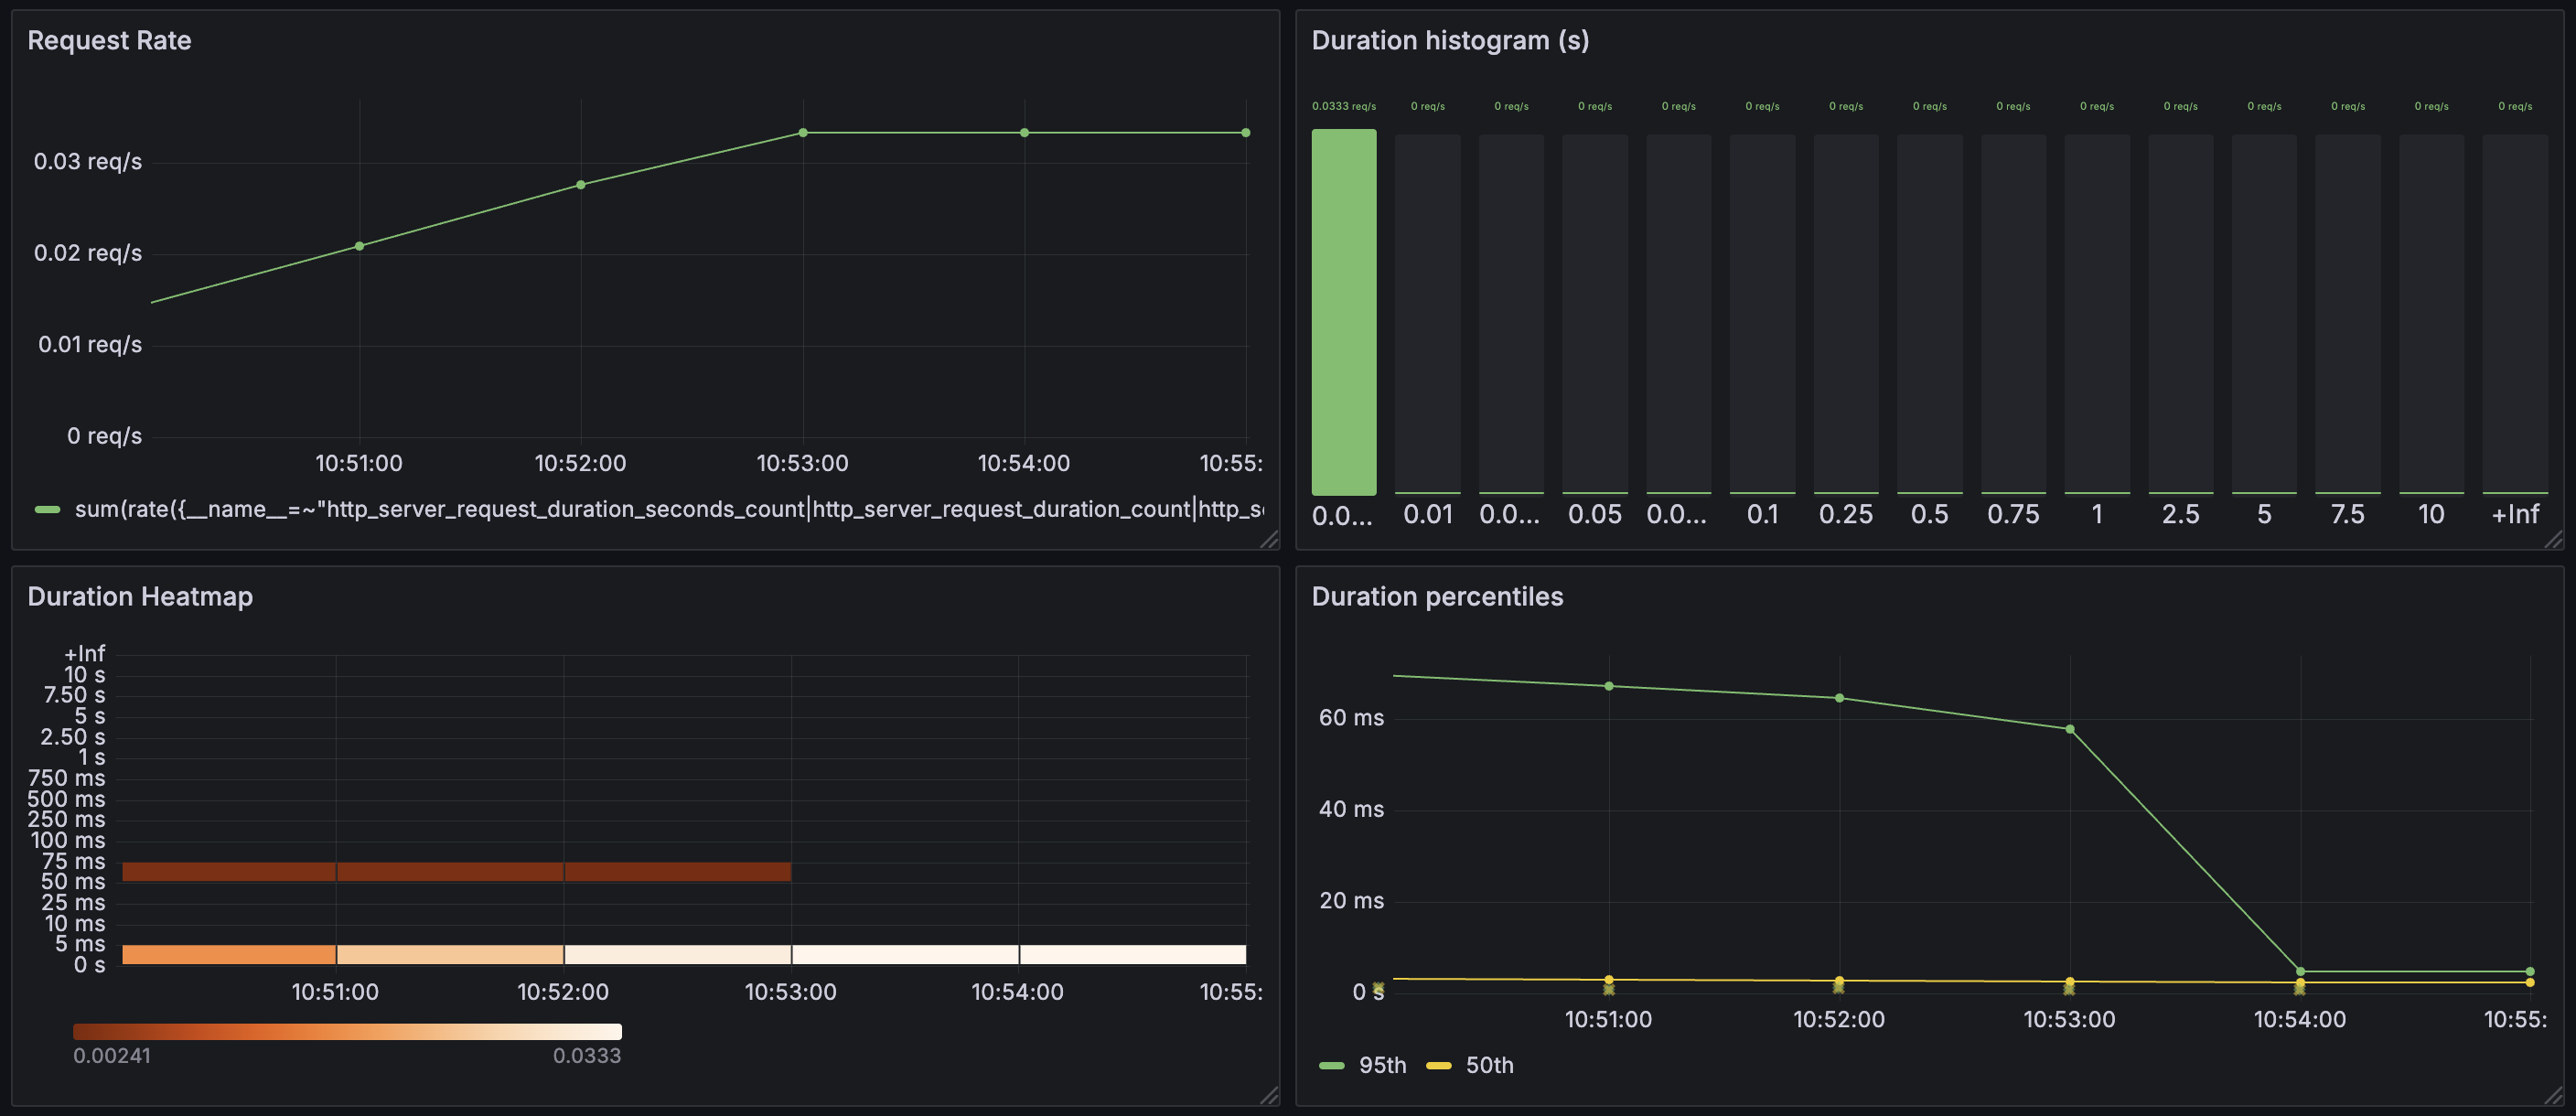
Get an overview of the HTTP request performance:
-
Navigate back to the Dashboards view from the menu.
-
Open the RED Metrics (classic histogram) dashboard.
Viewing application metrics
View application-level metrics:
-
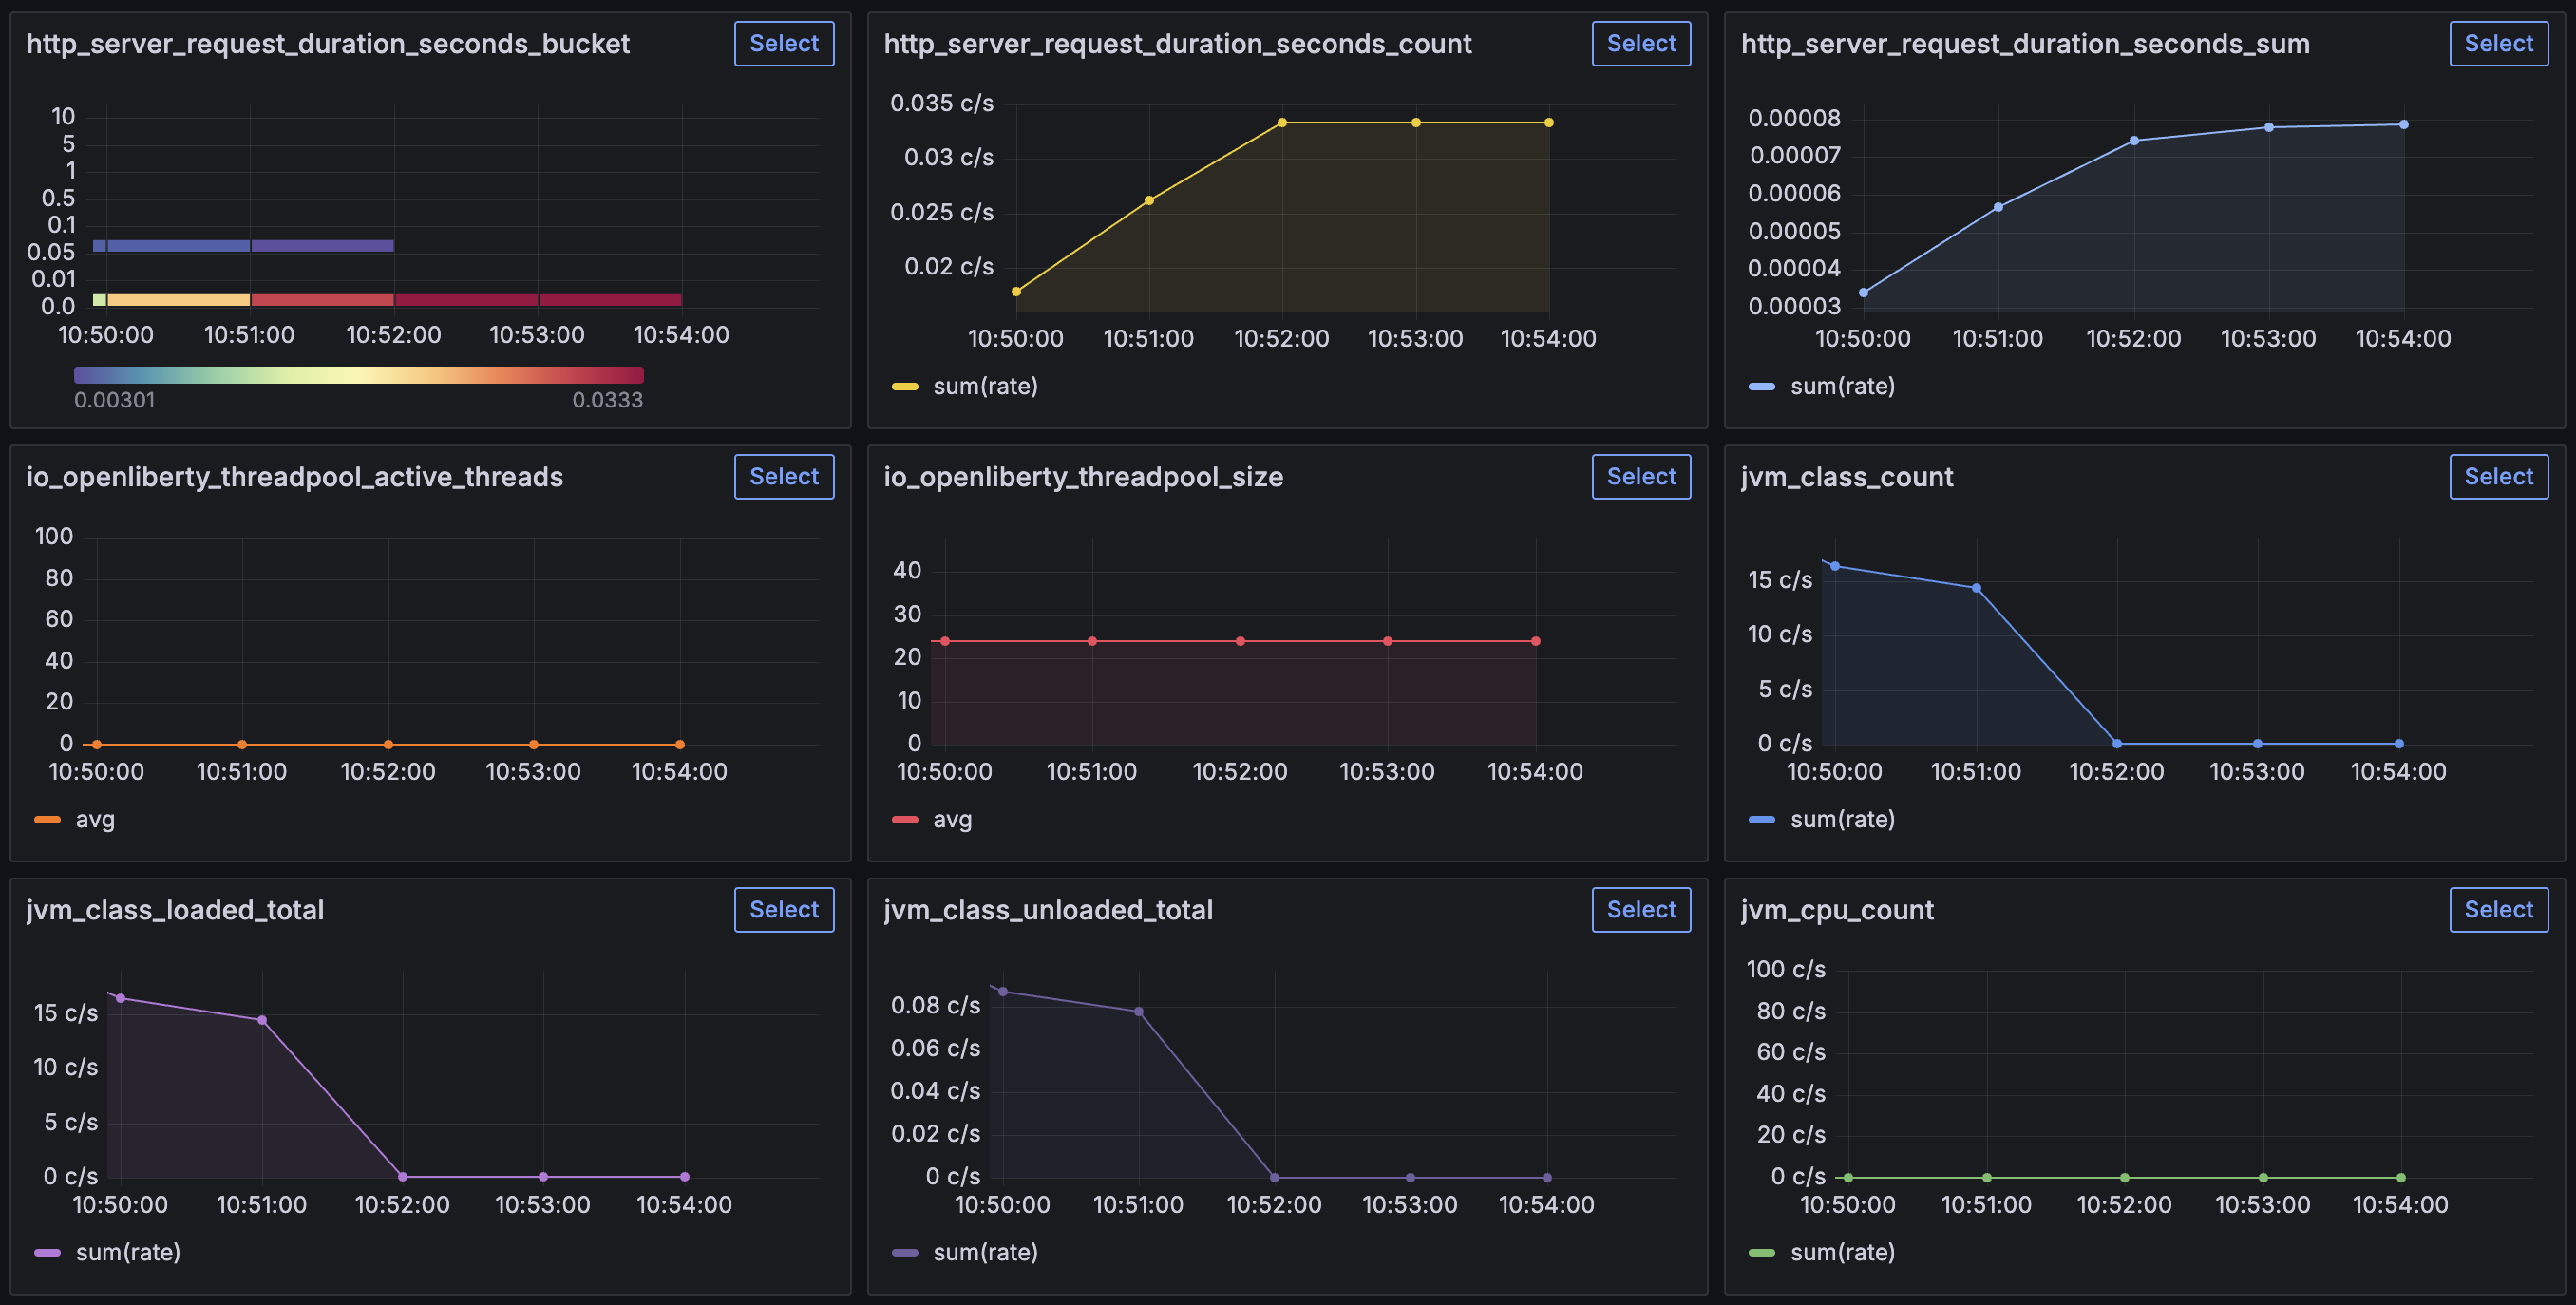
Navigate to Drilldown → Metrics from the menu.
-
In the Filters section, set
service_nametoinventoryorsystemto view application-specific metrics. You see a result similar to the following: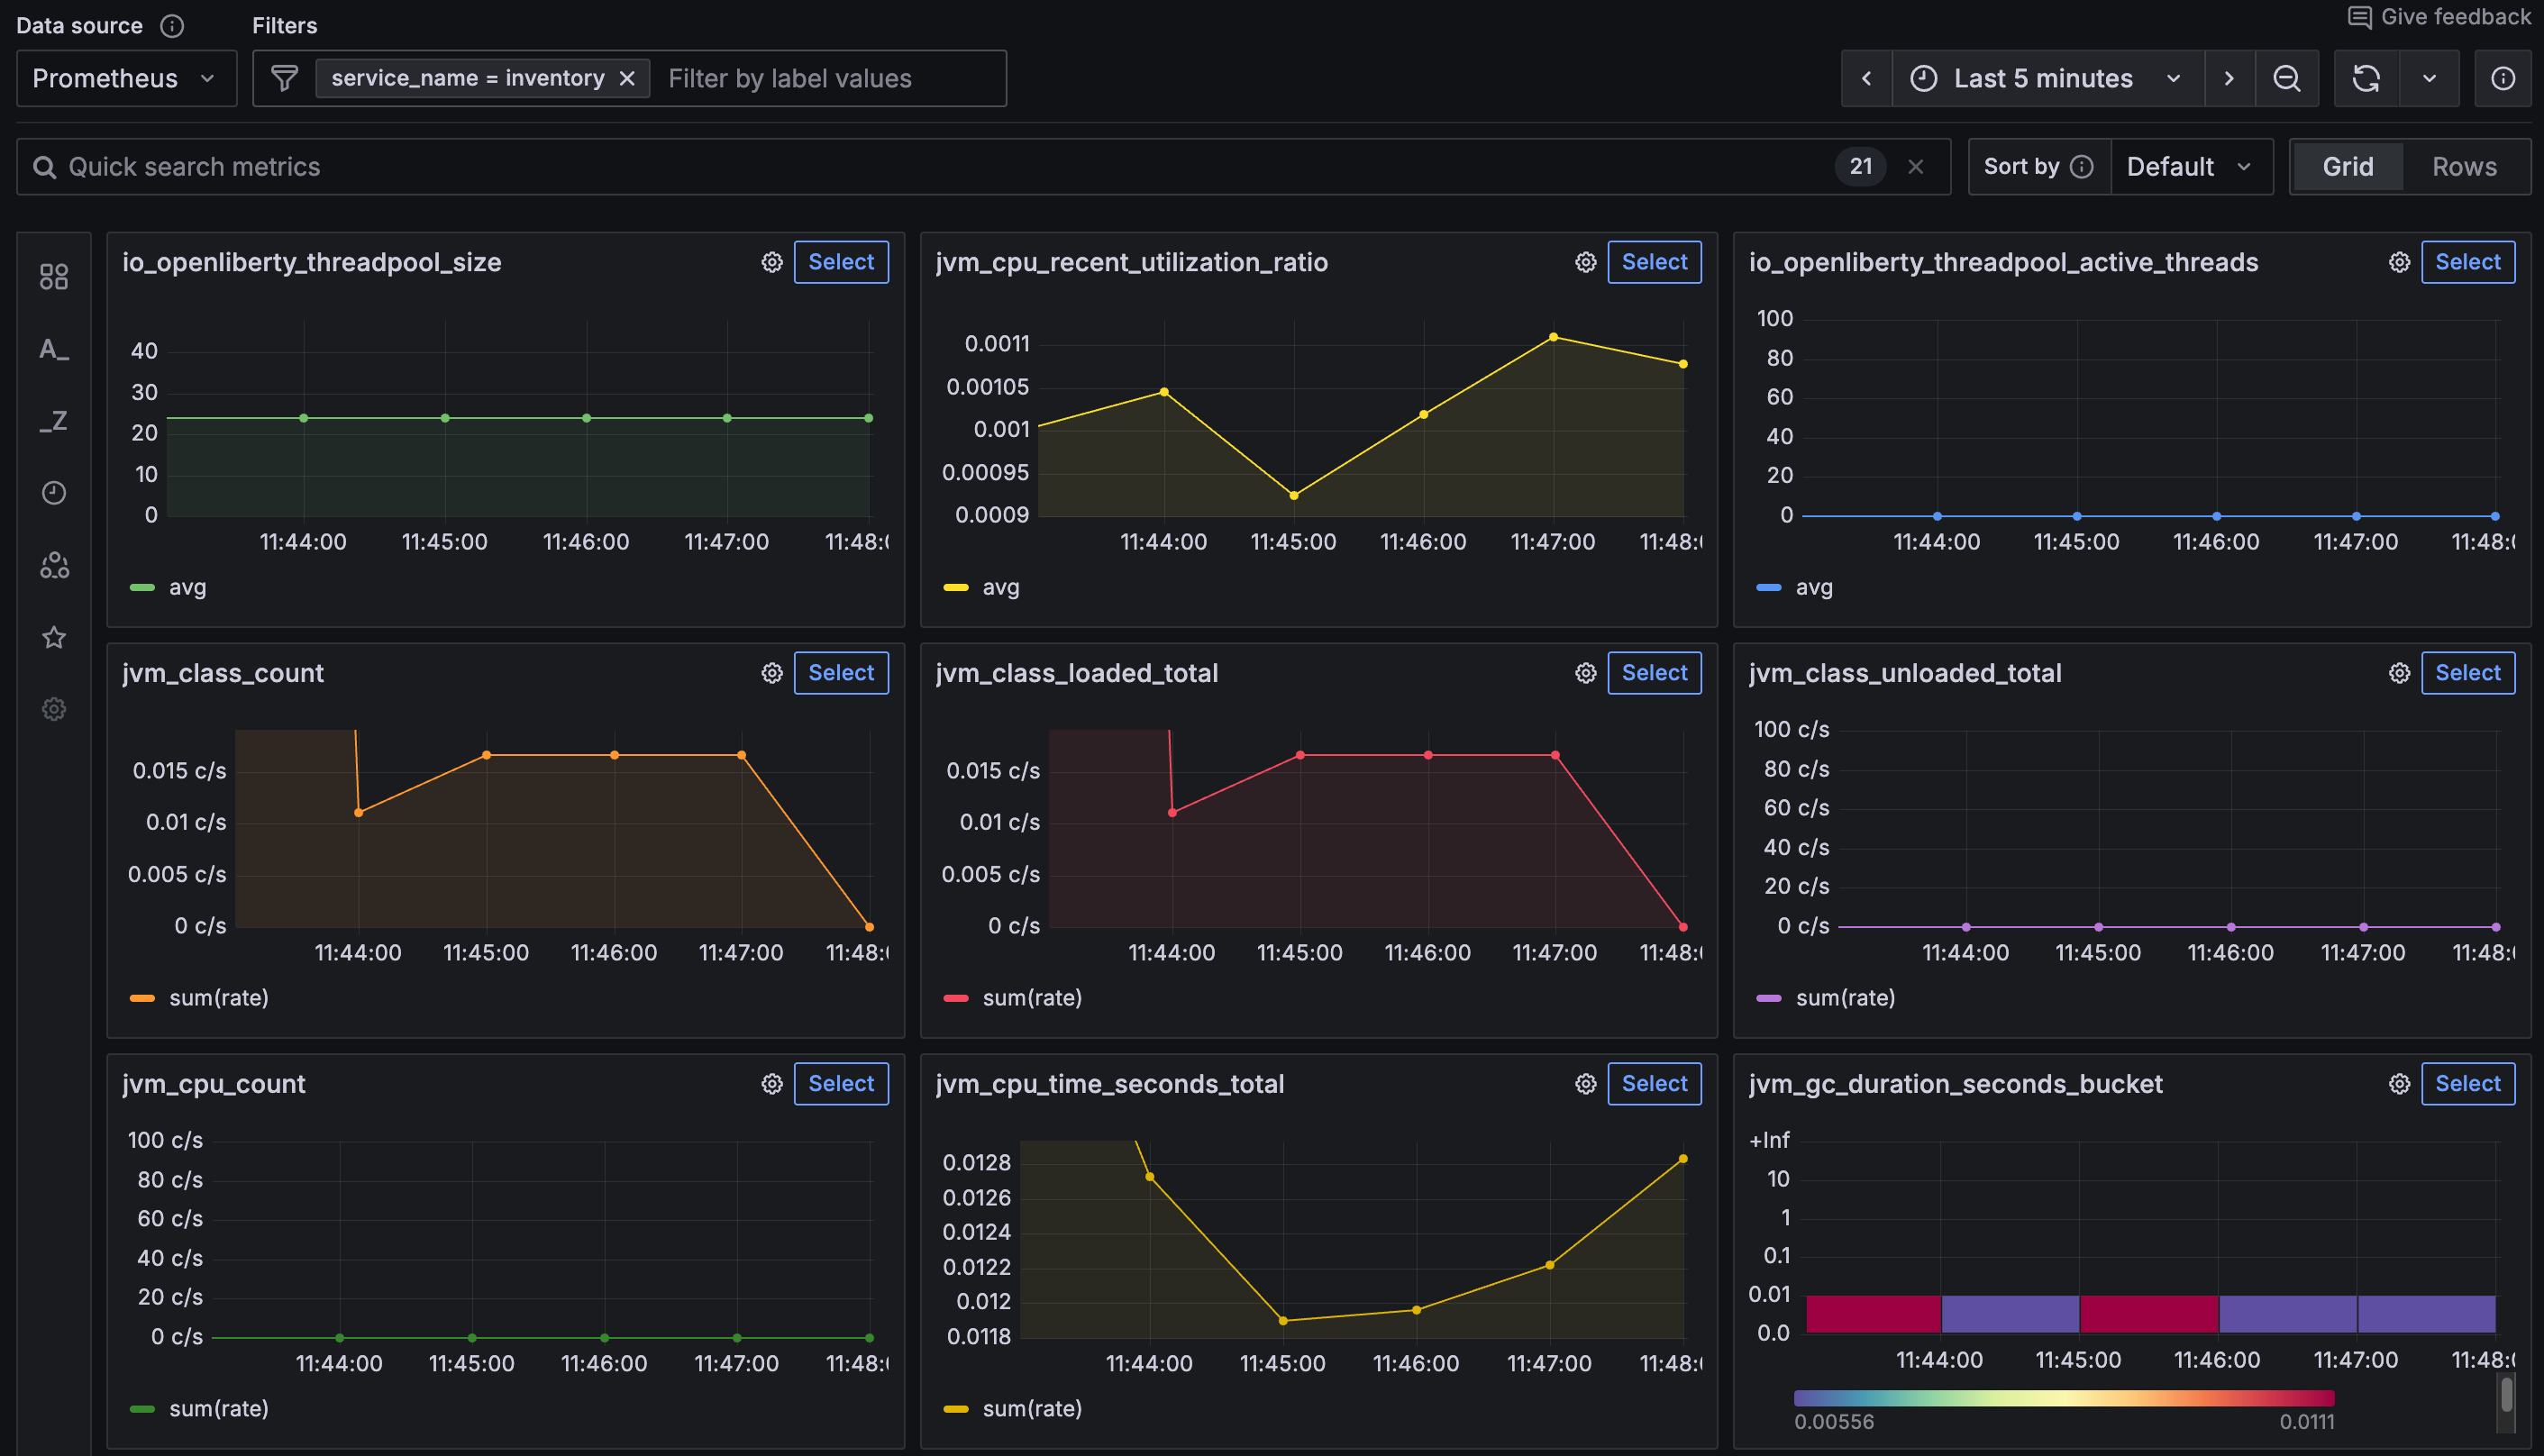
Enhancing application logs
When MicroProfile Telemetry is enabled, OpenTelemetry automatically collects logs from the Liberty message log stream. This includes logs that are written by using the java.util.logging API at the INFO level or higher, as well as messages from the System.out standard output and System.err standard error streams.
While System.out and System.err are useful for quick debugging, they are limited in production environments. These streams lack structure, consistent severity levels, and the contextual metadata that is critical for monitoring distributed systems. In contrast, the java.util.logging API produces structured logs with fine-grained control over log levels, built-in support for exceptions, and better integration with telemetry tools like Grafana.
InventoryManager.java
The current InventoryManager class logs messages by writing to System.out and System.err.
To observe a basic standard output log, visit the http://localhost:9081/inventory/systems/localhost URL to trigger a successful request.
Then, open the Grafana dashboard at the http://localhost:3000 URL.
In the Explore view, select the Loki data source. Set a filter for service_name = inventory and click the blue Run query button. The results appear in the Logs view by default. If it is not already selected, switch to Logs at the upper right of the Logs section to enable log expansion.

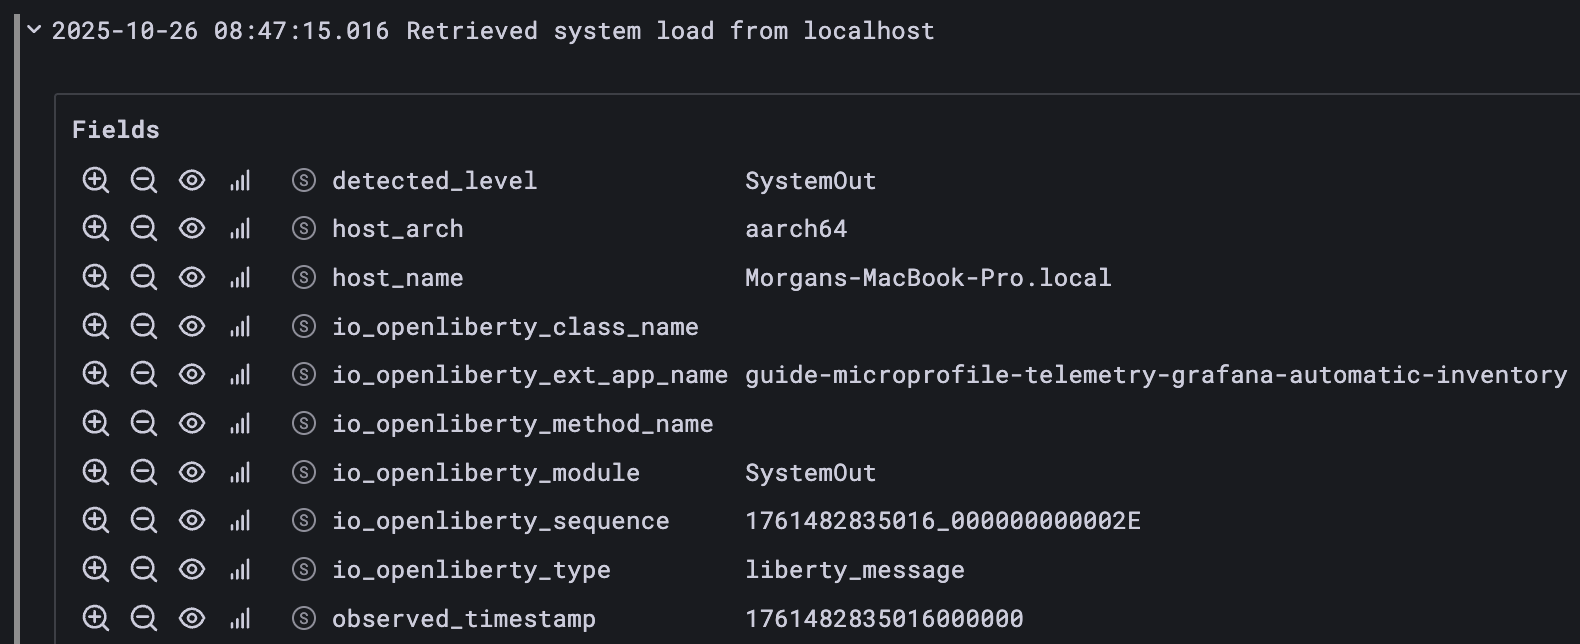
Locate the log entry Retrieved system load from localhost. When you expand it, you see that both the detected_level and the io_openliberty_module fields are set to SystemOut.
Next, observe a standard error log by visiting the http://localhost:9081/inventory/systems/unknown URL.
This simulates a request to a nonexistent host and triggers a RuntimeException.
Rerun the same query in Grafana. In the Logs section, locate and expand the following log entry:
Runtime exception while invoking system service: RESTEASY004655: Unable to invoke request: java.net.UnknownHostException: unknown: nodename nor servname provided, or not known
You see that both the detected_level and the io_openliberty_module fields are set to SystemErr. The error stack trace is included directly in the log message, and no information about the exception type is provided.

Although System.out and System.err logs are collected, they lack structured metadata. You cannot filter them by severity, separate stack traces from exceptions, or correlate them with originating classes and error types.
To enable structured logging, update your application to use the java.util.logging API.
Replace theInventoryManagerclass.inventory/src/main/java/io/openliberty/guides/inventory/InventoryManager.java
InventoryManager.java
The updated InventoryManager class now uses the Logger.getLogger() method to obtain a logger instance and Logger.log() method to write messages at appropriate levels, such as INFO for successful operations and WARNING for exceptions.
Because the services are running in dev mode, your changes are automatically picked up.
Return to the http://localhost:9081/inventory/systems/localhost URL to trigger a successful request.
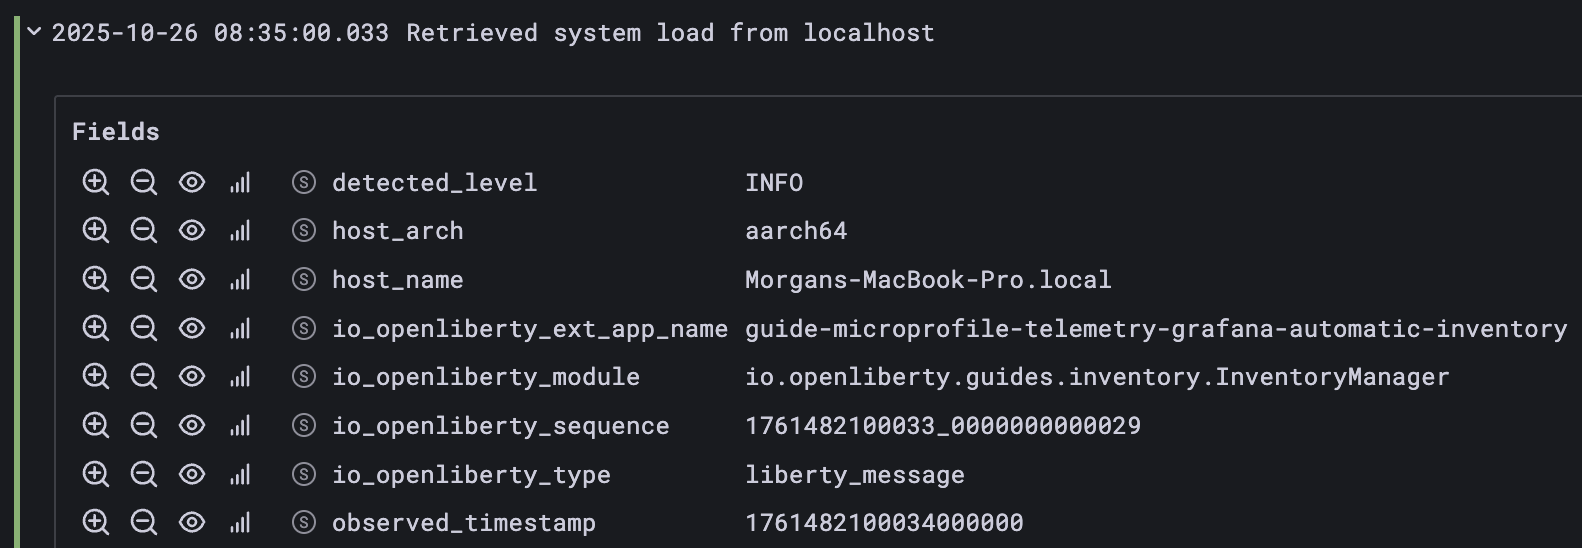
Rerun the Loki query in Grafana and locate the log entry Retrieved system load from localhost. Expand the entry and verify that the detected_level is set to INFO and the io_openliberty_module field contains the logger name, io.openliberty.guides.inventory.client.InventoryManager, which helps trace the origin of the log.
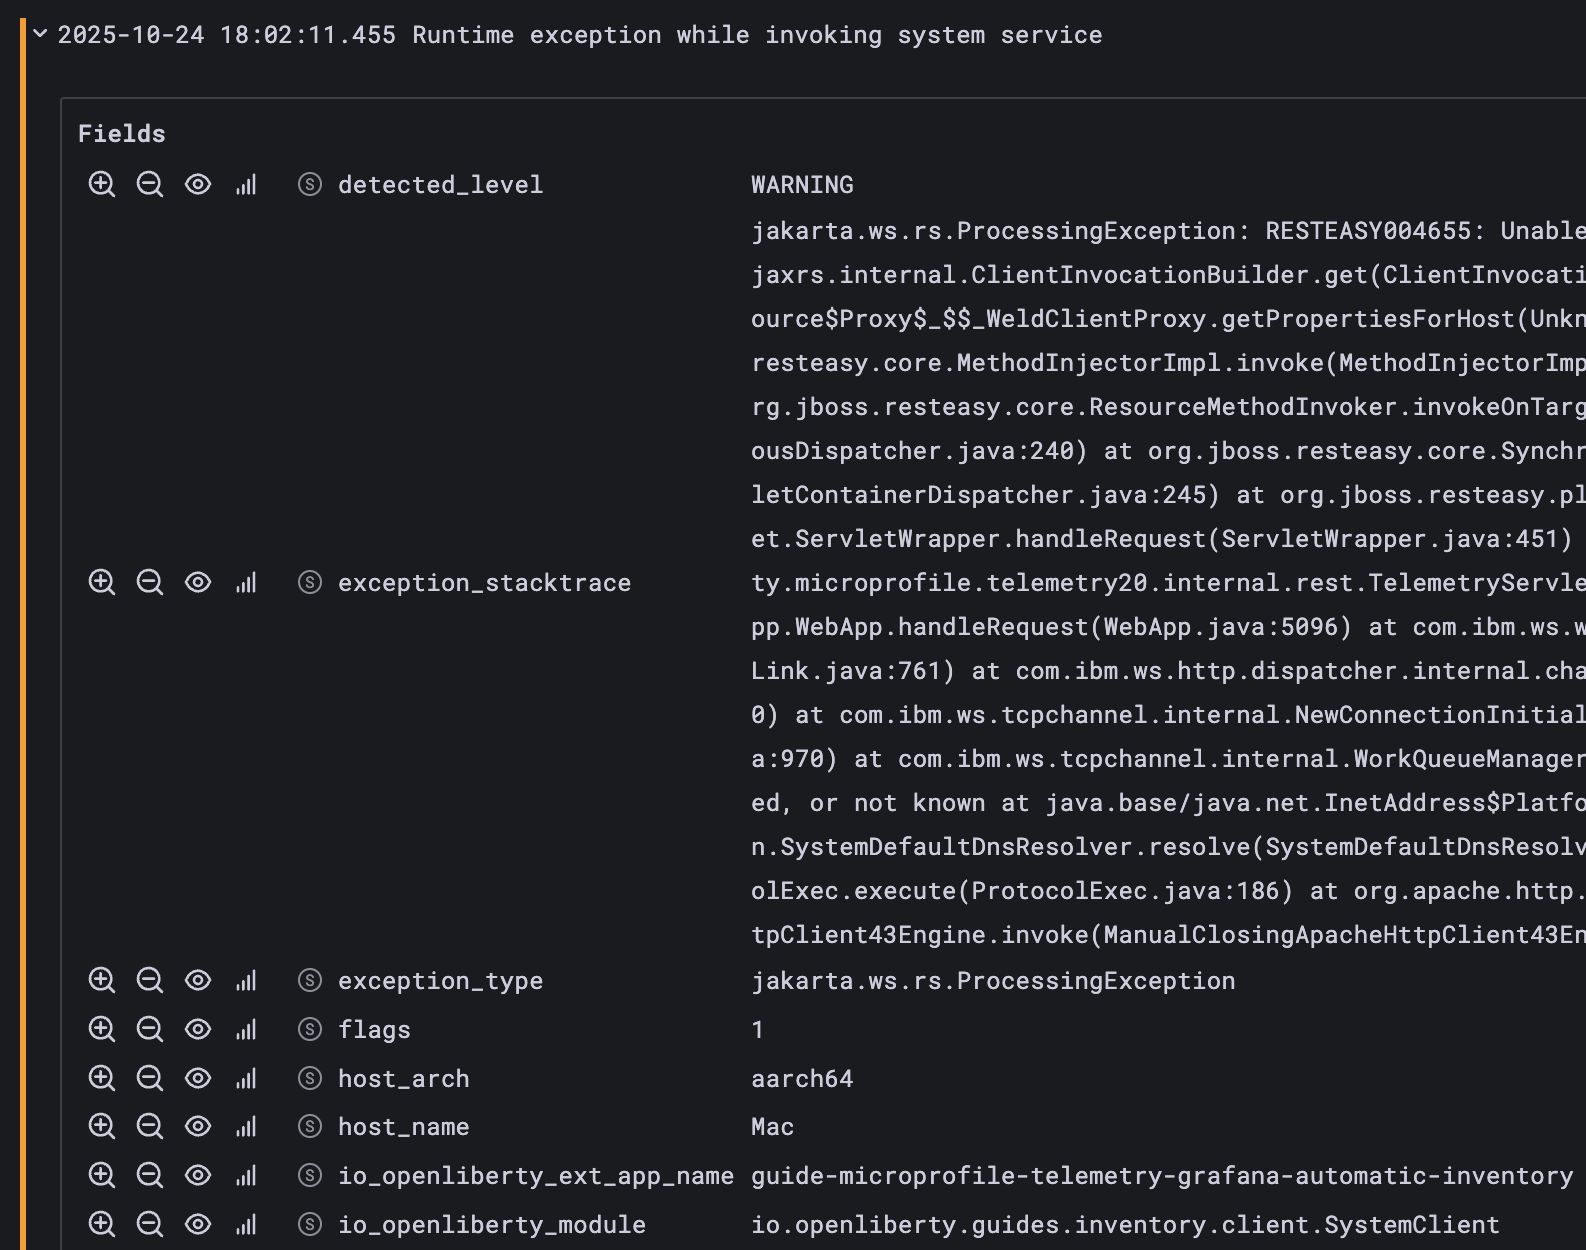
Next, access the http://localhost:9081/inventory/systems/unknown URL to trigger an exception.
Rerun the Loki query and locate the log entry Runtime exception while invoking system service. When expanded, the entry shows that the detected_level field is set to WARNING. The exception_stacktrace field contains a structured stack trace, and the exception_type field identifies the exception as jakarta.ws.rs.ProcessingException.
By default, OpenTelemetry collects only message logs. To enable the MicroProfile Telemetry feature to collect logs from different sources in Open Liberty, set the source attribute of the mpTelemetry element to a comma-separated list of sources.
Testing the application
Manually verify the telemetry signals by inspecting them in the Grafana dashboard. You can also run the included tests to check the basic functionality of the services. If any of the tests fail, you might have introduced a bug into the code.
Running the tests
Because you started Open Liberty in dev mode, you can run the tests for the system and inventory services by pressing the enter/return key from the command-line sessions where you started the services.
If the tests pass, you see an output for each service similar to the following:
-------------------------------------------------------
 T E S T S
-------------------------------------------------------
Running it.io.openliberty.guides.system.SystemEndpointIT
Tests run: 1, Failures: 0, Errors: 0, Skipped: 0, Time elapsed: 0.445 s -- in it.io.openliberty.guides.system.SystemEndpointIT

Results:

Tests run: 1, Failures: 0, Errors: 0, Skipped: 0
-------------------------------------------------------
 T E S T S
-------------------------------------------------------
Running it.io.openliberty.guides.inventory.InventoryEndpointIT
...
Tests run: 3, Failures: 0, Errors: 0, Skipped: 0, Time elapsed: 0.855 s -- in it.io.openliberty.guides.inventory.InventoryEndpointIT

Results:

Tests run: 3, Failures: 0, Errors: 0, Skipped: 0
When you are done checking out the services, exit dev mode by pressing CTRL+C in the shell sessions where you ran the system and inventory services.
Finally, run the following command to stop the container that you started from the grafana/otel-lgtm image in the Additional prerequisites section.
docker stop otel-lgtm
Great work! You’re done!
You just used MicroProfile Telemetry in Open Liberty to enable traces, metrics, and logs for microservices and the Grafana stack to collect and visualize the data.
Try out one of the related MicroProfile guides. These guides demonstrate more technologies that you can learn to expand on what you built in this guide.
Guide Attribution
Enabling observability in microservices with traces, metrics, and logs using OpenTelemetry and Grafana by Open Liberty is licensed under CC BY-ND 4.0

Copied to clipboard
Prerequisites:
Great work! You're done!
What did you think of this guide?


Thank you for your feedback!
What could make this guide better?
Raise an issue to share feedback
Create a pull request to contribute to this guide
Need help?
Ask a question on Stack Overflow


